Steps 3-11: Upfront Wine Making Decisions
Nine decisions have to be taken when the clean berries are ready to drop from the berry sorting table into the fermentation tank. We decide depending on the quality of the berries and the intended style of wine.
Step #3: Crush or Stomp? We decide whether we want to break the skins of the grapes with motorized rollers (crush) or with our feet or punchdown tool (stomp), or not at all (resulting in Full Berry Fermentation)
Step #4: Saignée? We decide whether to increase the concentration of flavors by siphoning off a percentage of the liquids. This increases the “skins & seeds”-to- “liquids” ratio. The juice that is siphoned off can be used to produce rosé wine or discarded.
Step #5: Lower Brix? We decide whether we need to lower the sugar level (Brix) by adding water.
Step #6: Adjust Acidity? We decide whether we need to adjust the pH up (add carbonates) or down (add tartaric acid) now. This can be done now or later, anytime before bottling.
Step #7: Add Stems or Oak Chips? We decide whether we want to add back some of the stems into the must to adjust flavor profile or add Oak Chips to adjust the phenolic extraction
Step #8: SO2 or native Fermentation? We decide whether to ferment with yeasts native in the vineyard and winery or with cultured yeasts purchased from external providers. If we decide to use cultured yeasts, we need to add SO2 now to prevent spoilage of the fruit and to kill off any indigenous yeasts
Step #9: Add Enzymes or Dry Ice? We decide whether we want to increase the extraction of desirable components in the skin artificially, pulp and seeds into the juice by adding enzymes that break down cell walls. Adding dry ice also breaks down cell walls where berries touch the ice; it is less effective but has the added benefit of initiating a cold soak.
Step #10: Add Fining Agents? We decide whether we want to add fining agents to bind and precipitate spoilage bacteria (important for musts with low acidity, when SO2 is not as effective in controlling microbes).
Step #11: Cold Soak? We decide whether we want to extract desirable skin components and pulp into the grape juice before fermentation is converting the juice into alcohol. Again the idea is to get more aromas and flavours. Soaking needs to be done at a low temperature of around 50-55 oF to prevent spoilage.
This chart shows the detailed process and the choices made in 2020
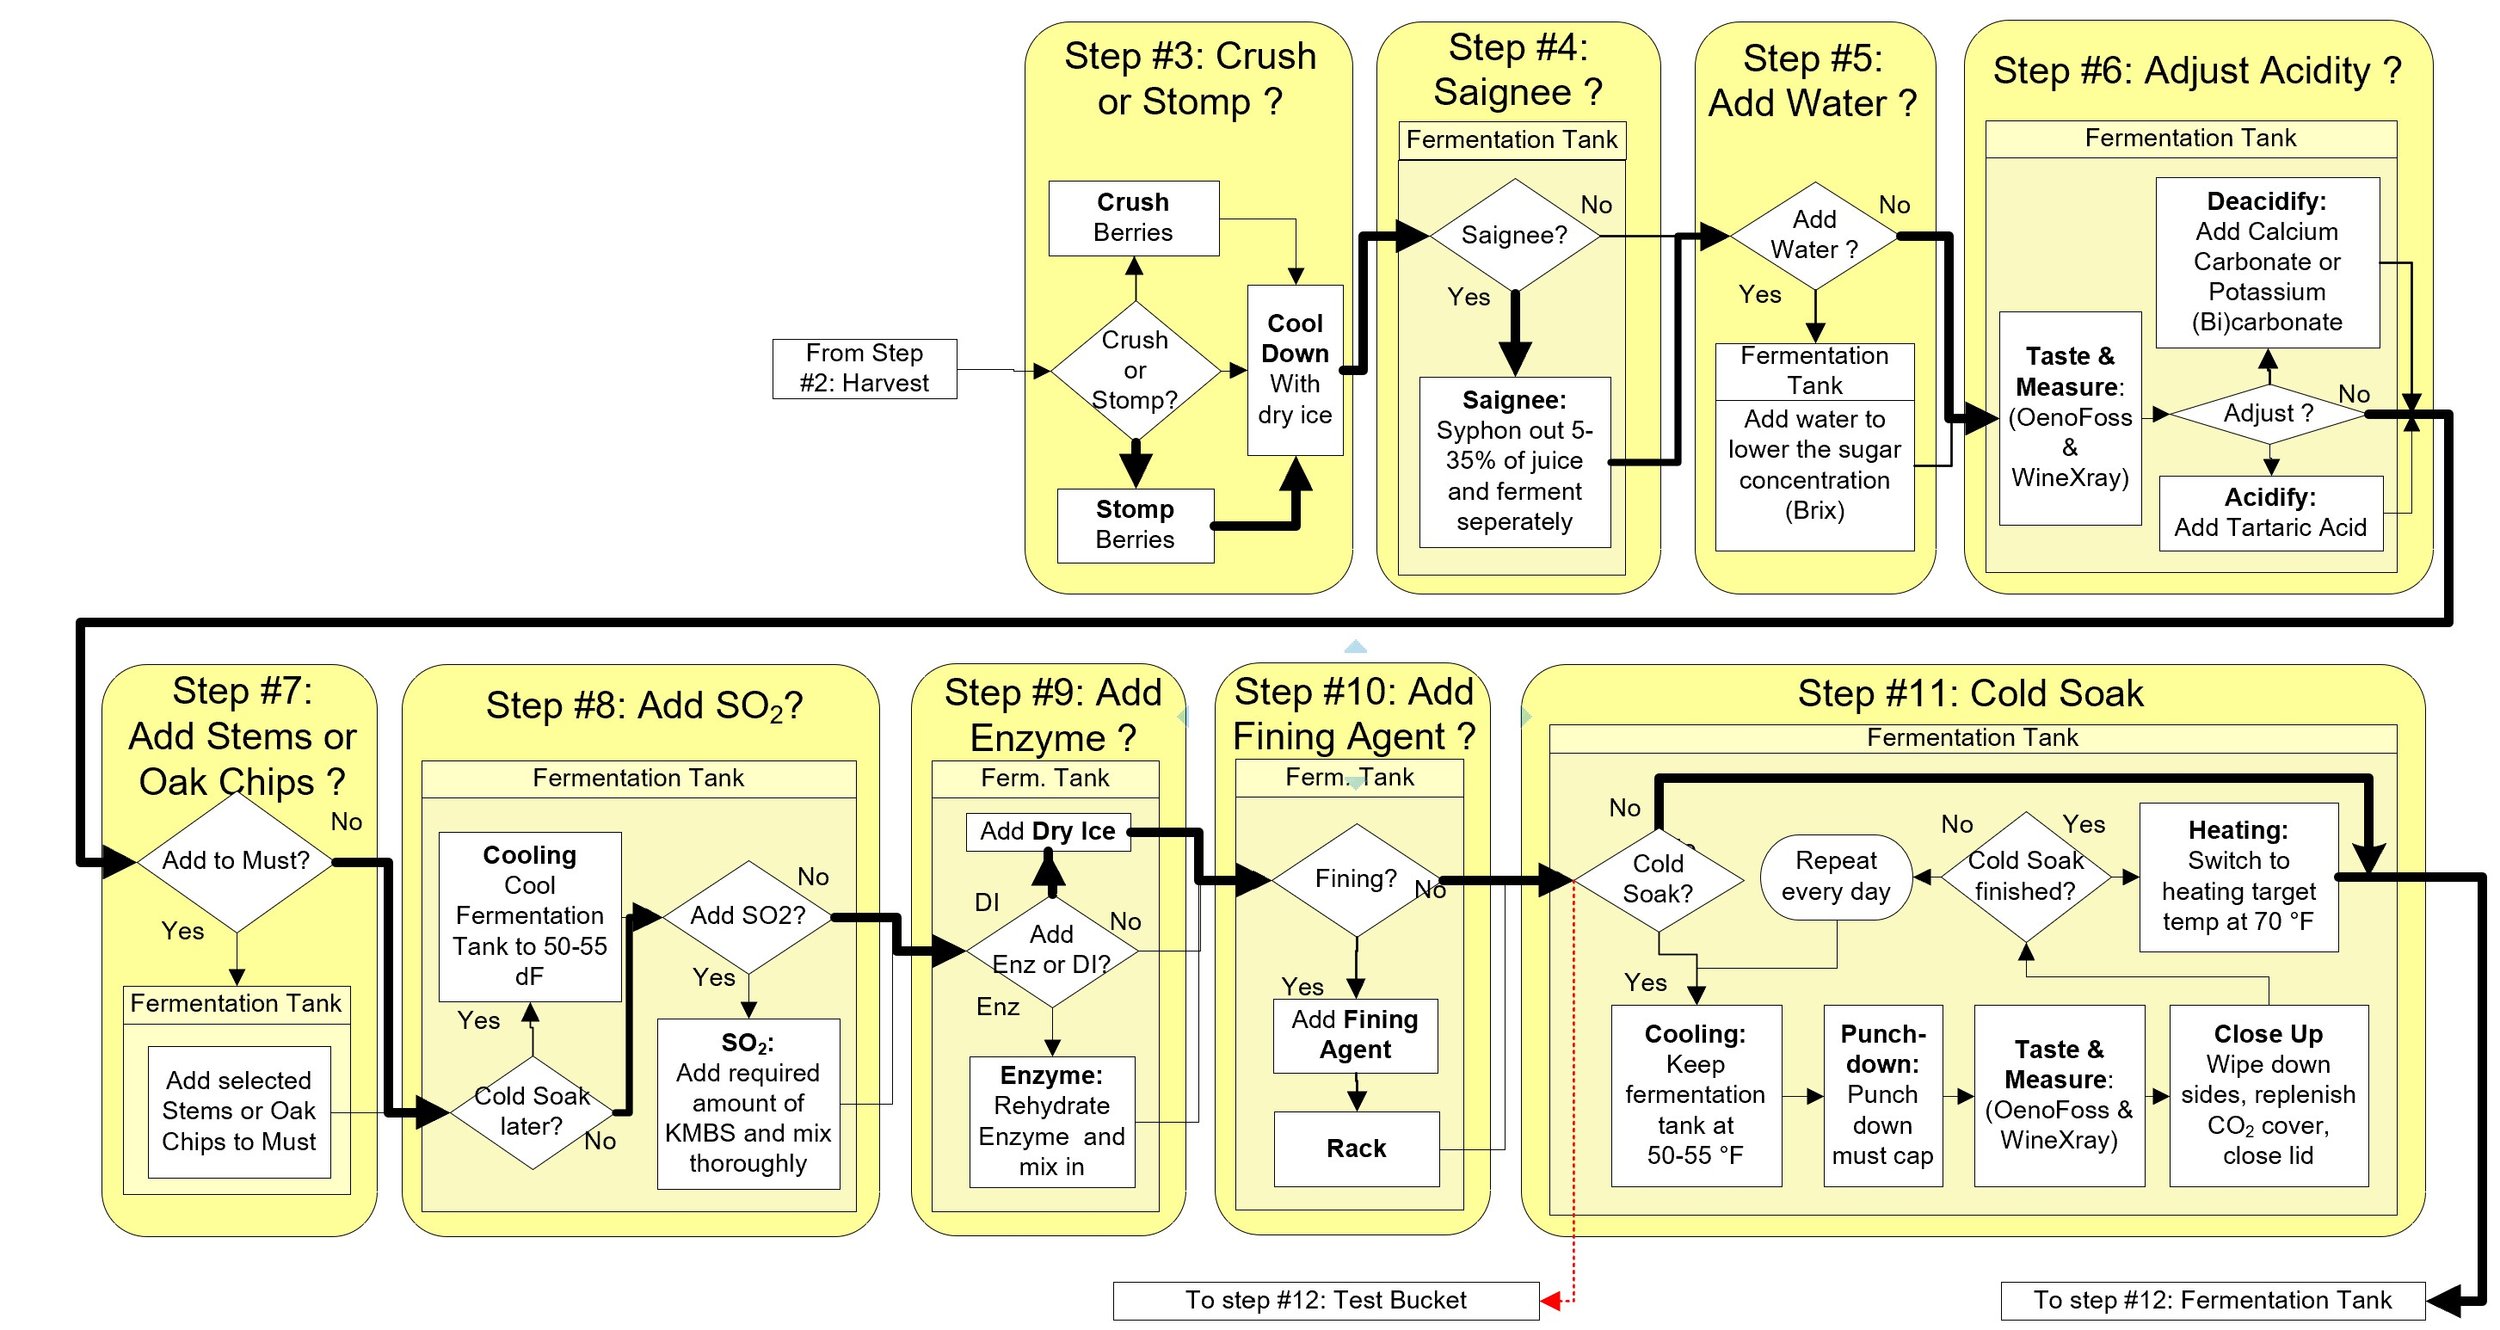
Natural style winemakers tend to stay away from using cultured yeasts, enzymes, oak chips, acidity adjustments, and fining agents; interventionist winemakers tend to use all available tools in the box. The following paragraphs describe the choices and actions in detail
Step #3: Crush, Stomp, or Full Berry Fermentation?
At this juncture, the pulp and juice in the grapes have the color of white wine. However, it turns red during cold soak and fermentation as phenolic compounds from the skin and seeds dissolve into the juice. This transfer can be accelerated by breaking the skins of the grapes before they are dropped into the fermentation tank, a process called crushing or stomping the grapes:
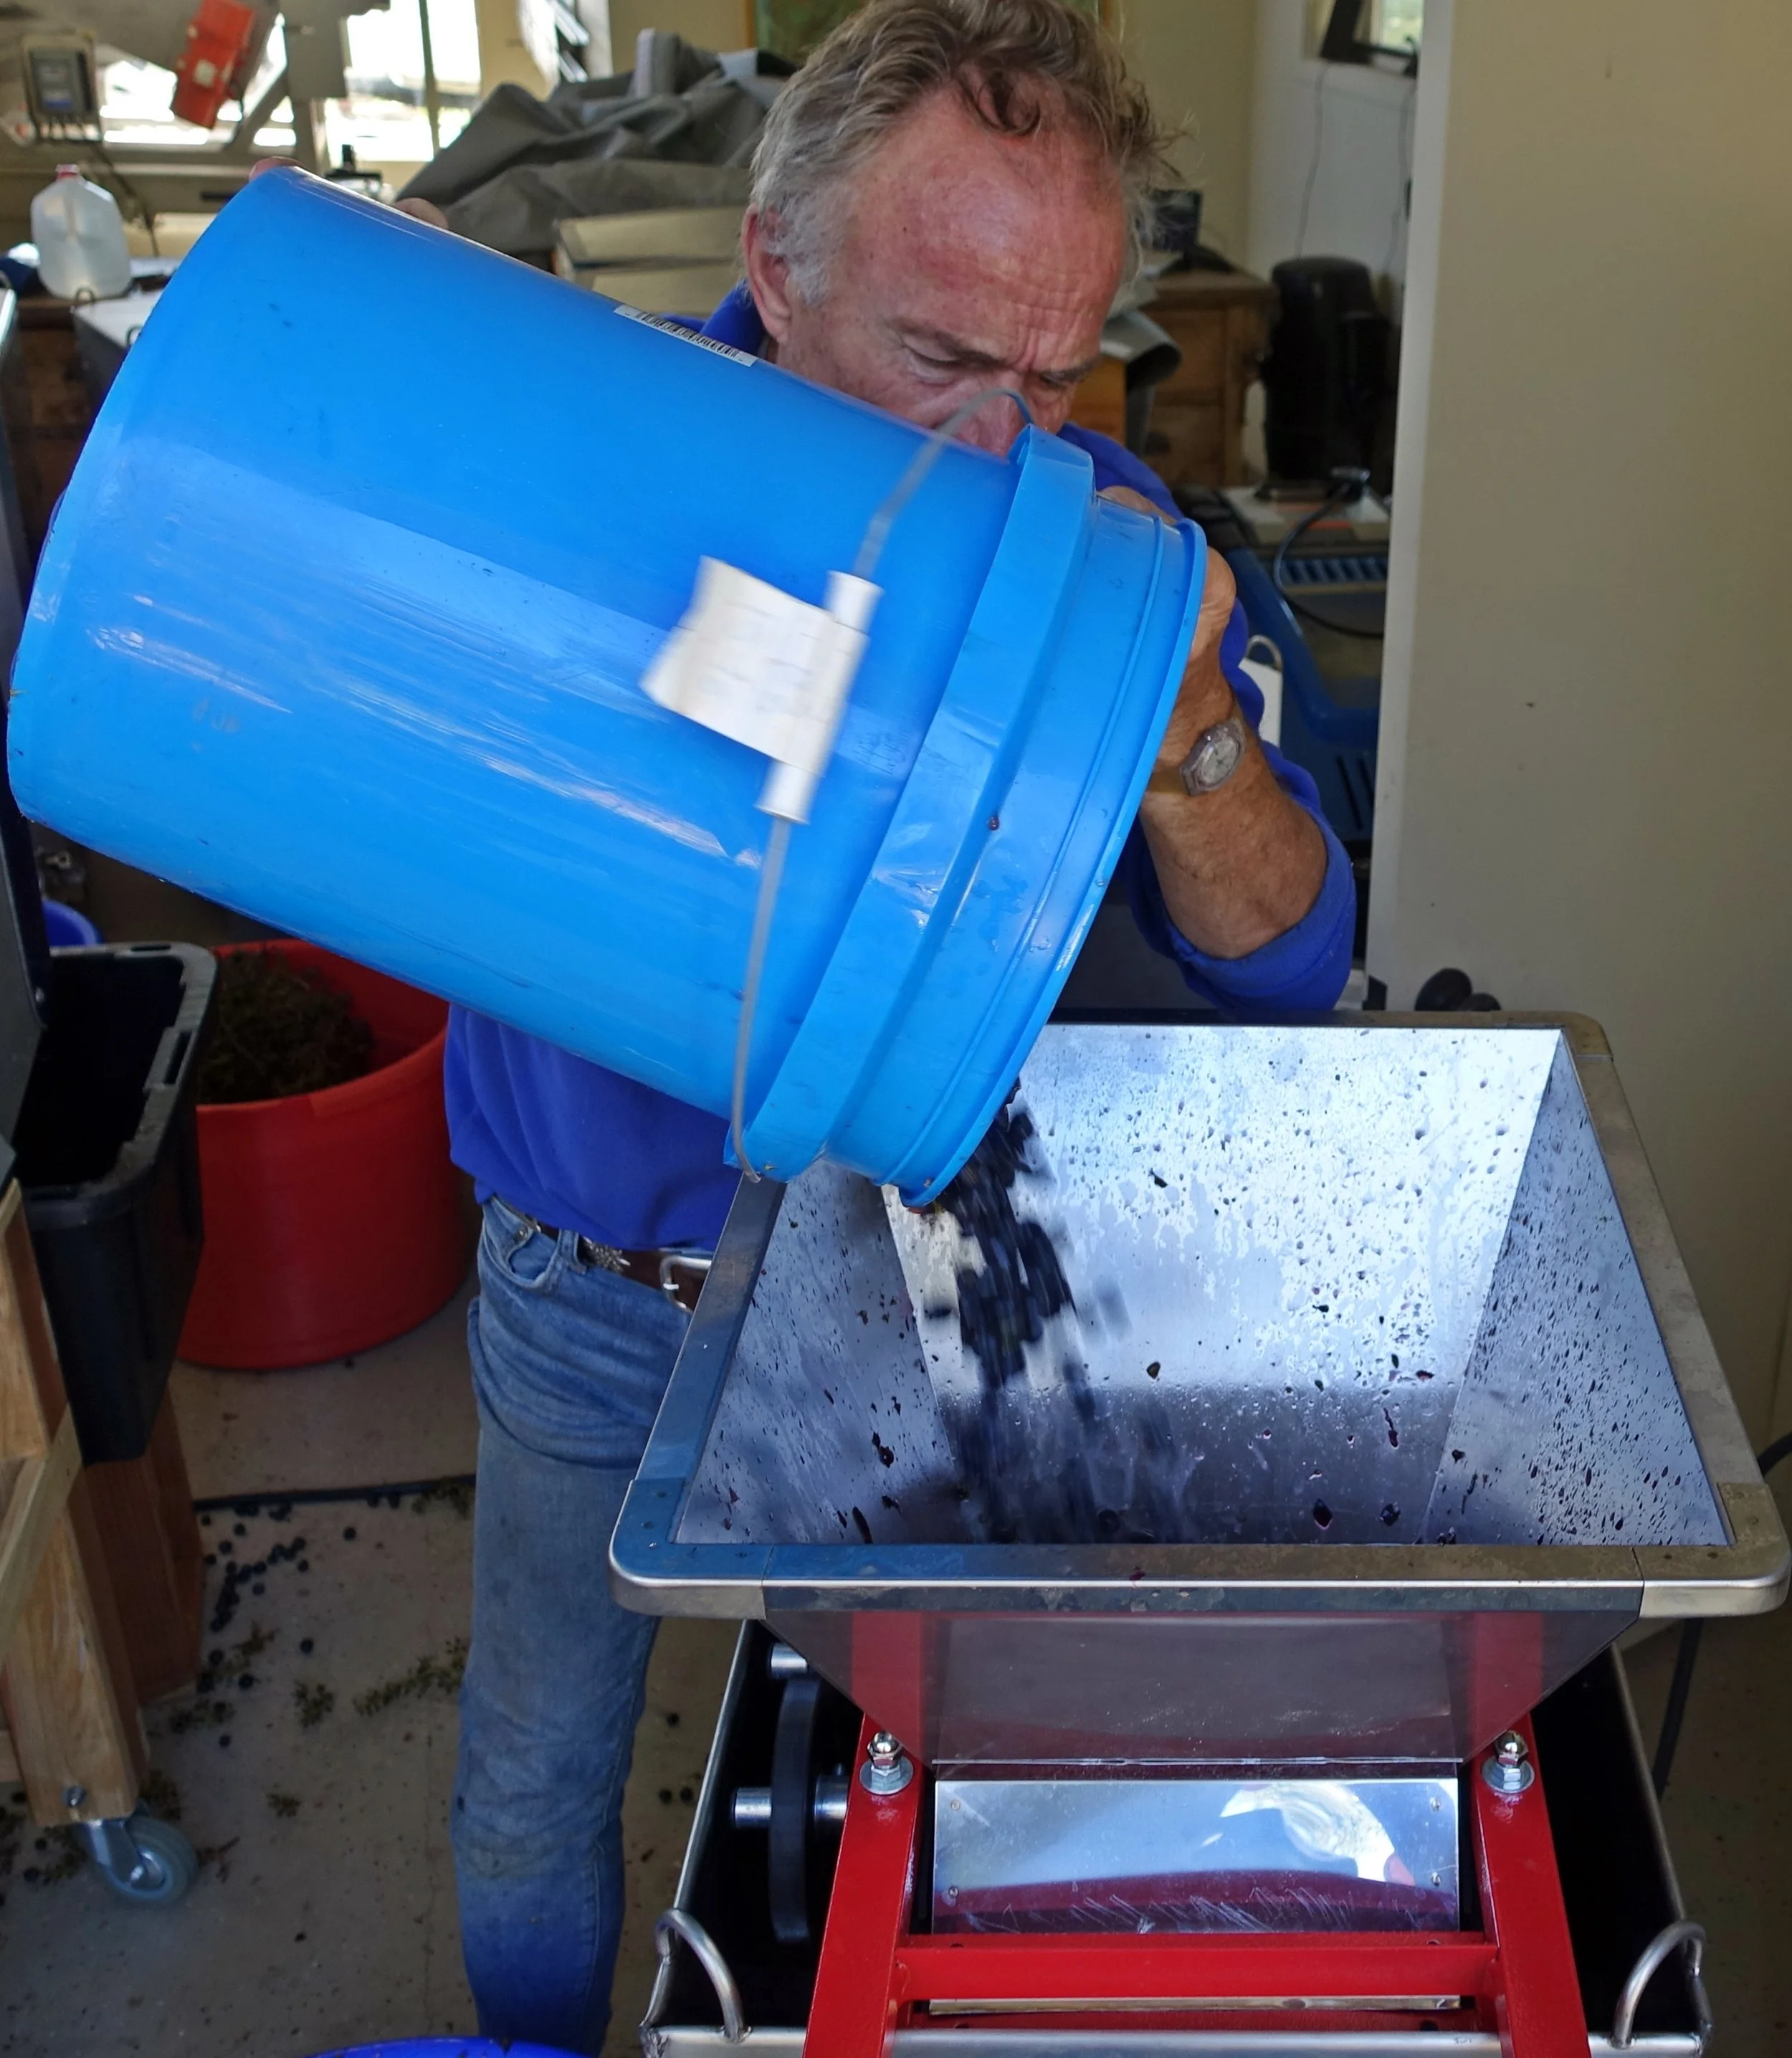
Crushing is usually accomplished by passing the berries between two rollers spaced at a slightly smaller distance than the berries' diameter. Care must be taken not to crush the seeds inside the berries because that would release unwanted chemicals into the juice.
We built our Crusher to sit on top of a fermentation tank in 2016 based on components salvaged from hobby-winery crushers sold by Williams Brewing.com. An electric motor drives two rollers over a set of external gears. A funnel guides the grapes to be crushed to fall between the rollers, and the crushed berries drop into the fermentation tank. The picture shows the Crusher over a fermentation tank and fed by buckets.
Stomping is accomplished by a person stepping into the fermentation tank and on the grapes. This is old-fashioned, and the job is usually reserved for virgin maidens when available [increasingly challenging to find given the weight required!]. The alternatives are grown-ups (possibly in wet-suits) or stainless steel robots. Stomping is considered somewhat gentler on the grapes than breaking the cell walls with rollers.
If the grapes are very ripe, they tend to break open during destemming and crushing, or stomping may not be necessary at all.
If the grapes are left whole, then, during subsequent fermentation, the yeast will need to enter the berry through the small hole created when the berry stem was removed. This takes longer and is called Full Berry Fermentation.
Step #4: Saignée?
Saignée (from French, meaning “bleeding”) is one method for producing rosé wine. It started, though, with the intent to remove liquid from the grape must before the juice gets exposed to skins. The idea is to increase the “skin-to-liquids” ratio by removing liquids upfront so that the remaining liquids get more exposure to the color and tannins that are extractable from the skins and seeds. The purpose is to increase the flavor and color density of the wine. Saignee is often used in a bad-weather-year when the grapes did not get enough warmth and sunshine to fully mature. The juice is either separated as fallout from the vibration table or siphoned off within 1-2 hours after destemming. The slightly pink juice is either discarded or fermented separately to produce rosé wine.
Using a vibrating berry sorting table, as we do, automatically diverts some juice before the berries reach the fermentation tank. If sifted to eliminate MOG (Materials Other than Grapes), this juice can be poured back into the fermentation tank, discarded, or used elsewhere.
Step #5: Add Water?
We pick the grapes when they are ripe. Simplistically ripeness is measured by the amount of sugars accumulated in the berries. A good guideline is: berries are ripe when sugars reach 23-25 Brix (i.e., grams of sucrose per 100 grams of juice). A better way to evaluate ripeness is to taste the juice, skins, and seeds or measure accumulating Anthocyanins.
Particularly in a year with heatwaves, Brix levels at harvest may reach 26-27. If left to ferment, this amount of sugar will lead to alcohol levels close to or over 16%, negatively affecting the taste of the wine. Therefore it is advisable to reduce the sugar concentration before fermentation or reduce the alcohol level later with reverse osmosis. The easiest way to reduce sugar concentration is to add distilled water – the rule of thumb is: a 10% reduction in Brix or projected alcohol is accomplished by adding 10% of water. In most countries, the law prohibits commercial wineries from adding significant amounts of water to must; but we can do what we like since we do not sell our wine.
Step #6: Adjust Acidity?
Acidity affects the wine in many ways: microbial activity, protein tartrate stability, malolactic fermentation, color, flavor, and aging potential. Therefore, adjusting the acidity is an integral part of the winemaking process. Adjustment is advisable when the must has a pH below 3.2 or above 3.7 or a Titratable Acidity (TA) above 7.5 or below 5.0.
Also see: http://winemaking.jackkeller.net/acid.asp
Increasing acidity: The addition of acid to grape juice, must, or wine decreases the pH and increases the TA of the wine. The low pH will make SO2 more effective against oxidation and bacterial infections. Reduced use of SO2 preserves color intensity and increases the aging potential of the wine. The amount of acid needed to correct the acidity deficiency depends on the total acidity, the pH, and the buffer capacity of the juice, must, or wine. The choice is between adding tartaric, malic, or citric acids as they will affect the pH, TA, and taste of the wine differently. The general guidelines are
One g/L addition of Tartaric acid will increase the TA by about 1.0 g/L and decrease the pH by 0.1 pH units.
One g/L addition of Malic acid will increase the TA by about 1.12 g/L and decrease the pH by 0.08 pH units.
One g/L addition of Citric acid will increase the TA by about 1.17 g/L and decrease the pH by 0.08 pH units.
Adding acid can result in some precipitation of potassium tartrate (KHT), affecting both pH and TA. Therefore, it is highly advisable to make acid additions in small steps or do a bench test with the must at hand before making any additions.
Decreasing acidity: Red wine is usually put through a “malolactic fermentation” (see Step #17) after the fermentation of sugars into alcohol. In that step, malic acid is converted to lactic acid, increasing the pH by around 0.2, decreasing the TA by around 2, and softening the acid's mouthfeel. If that projected reduction is not substantial enough, deacidification with precipitation agents may be necessary at this juncture. The deacidification agents precipitate some tartaric acid in the form of insoluble salts.
Calcium Carbonate CaCO3 forms carbon dioxide and precipitates calcium tartrate (CaT). However, this introduces a risk of calcium tartrate instability.
Potassium Bicarbonate (KHCO3) and Potassium Carbonate (KH2CO3) deacidify grape juice, must, or wine, possibly improving quality or rounding off-flavors. They both form carbon dioxide and precipitate potassium bitartrate.
With the double salt method, we can reduce tartaric and malic acid. Double salt deacidification is a technique in which we take up to 20% of the volume to be treated and add all the CaCO3 calculated needed for the total volume. The goal is to precipitate tartaric and malic acid in roughly equal parts. The high pH over 4.5 produced in this fraction is to facilitate this.
A bench trial should be performed before any intervention.
Step #7: Add Stems or Oak Chips?
Do we want to add some of the stems (removed in the destemmer) back into the must? This is often done with Pinot grapes that are low in phenolics but less with other varietals. The goal would be to add more tannins to the wine. We have not added any stems back to date.
If desired, a small amount of specially treated oak chips can be added to the must to improve the projected flavor profile of the wine. Purveyors of these oak chips claim they can enhance the binding of anthocyanins and round out the mouthfeel; others can mask green flavors. Some argue oak chips are a substitute for soaking and fermenting in oak barrels. The jury is still out on the effectiveness of oak additions.
Step # 8: Add SO2
Sulfur dioxide (SO2) is the oldest and arguably one of the most important additives used in winemaking. When present in sufficient concentration, SO2 has five major effects in wine/musts: (1) SO2 is a strong antimicrobial agent and provides a protection against a wide array of detrimental microorganisms; (2) it is an effective antioxidant that consumes oxidants such as hydrogen peroxide or quinones formed during the course of wine/must oxidation; (3) it can inhibit polyphenol oxidase enzymes present in grapes; (4) it reversibly binds and bleaches wine pigments, particularly monomeric anthocyanins; and (5) it reversibly binds aldehydes and ketones produced by oxidation or during fermentation, rendering them non-odorous (Waterhouse et al. 2016)
There are four different instances when SO2 is added to must and wine:
After grape sorting and before cold soak, fermentation will be done with commercial yeasts (i.e., step #8). The purpose here is to kill off all native non-saccharomyces yeasts and bacteria upfront and protect the wine from accidental spoilage
After the malolactic fermentation has finished, to protect the wine during cellaring
During cellaring whenever we top up or rack a barrel (every 1-2 months).
Just before bottling to protect the wine in the bottle
SO2 is added to most wine made today’, but there is a clear tendency to reduce the amount used – particularly for the very high-end and artisan wines. The less SO2 is used, the higher the risk of spoilage. Thus very clean grapes and winery/cellar equipment become even more critical. Details on how to measure SO2 concentrations and how much to add are provided in the Laboratory section.
The first opportunity to reduce the use of SO2 is right up front: before fermentation.
SO2 kills off bacteria and spoilage material carried into the winery from the vineyard with the grapes or have over-wintered in the winery. At this juncture, SO2 also kills off any native non-saccharomyces yeasts. This is desirable in high-volume operations when laboratory-grown yeasts of known origin and characteristics are used to ensure consistent fermentations and wine quality. These cultured yeast are derived from samples collected in the most prestigious highest quality vineyards in the world. Since different yeasts applied to the same grapes produce wines with varying taste profiles, yeast selection is a key decision for the winemaker.
On the other hand, native yeasts that arrive with the grapes provide “terroir” or individuality/uniqueness to the wine produced, making native fermentations attractive to artisanal winemakers. Their use, however, increases the risks of stuck fermentations, a significant production headache. One way around this conundrum is to extract yeast cultures in the vineyard and grow selected strains in the laboratory, then clean the grapes when they come in with SO2 and subsequently inoculate with the in-house grown cultures, thus preserving the “terroir.” This, however, is only economically viable for very high-end wineries.
So, if the intention is to do a native fermentation, it is better not to add any SO2 at this juncture or limit the addition to less than 20 ppm (parts per million, or grams per metric ton).
Step #9: Add Enzymes?
Enzymes are catalysts for biological reactions. Enartis Vinquiry (www.enartisvinquiry.com ) and Laffort (www.laffort.com ) are the leading developers and producers of enzymes for the wine industry. Some enzymes are used before and during fermentations to accelerate the break-down of grape cell walls so that preferred tannins from cell walls (compared to less preferred tannins from the seeds) are more readily released into the juice. The result is improved color stability of the wine and softer tannins.
Step #10: Add Fining Agents?
SO2 does not work effectively to control bacterial infections when the acidity of the must is low (i.e., pH above 3.7). In this case, we may decide whether to add a fining agent to bind and precipitate spoilage bacteria. For an example and more detail, see the Enartis video http://www.enartis.com/us/focus-on/webinars/high-ph-red-winemaking_5744.htm.
Step #11: Cold Soak?
A further technique to increase the release of color (and to a lesser extent tannins) from the grape walls into the juice is to let the crushed or stomped grapes soak in their juice at around 50°F for a few days before fermentation starts. The low temperature prevents spoilage and an accidental onset of fermentation. During cold soak, the must has to be covered with a blanket of Argon or CO2 to avoid oxidation, and the grapes need to be agitated and punched down daily. There are two ways to achieve this: either by adding a daily dose of dry ice (which reduces the temperature and releases CO2) or cooling down the fermentation tank with glycol. Using dry ice has the added benefit of breaking down cell walls (effectively flash freezing at the contact points). In 2013 we switched to an insulated fermentation tank with a cooling jacket fed with glycol from a refrigeration unit. The fermentation tank was built by Santa Rosa Stainless Steel (www.srss.com ) on specification; the refrigeration unit is a Kreyer Chilly Max (www.kreyer.com) bought from MoreWinePro (www.morewinepro.com ).
As the skins separate from the juice, they start forming a cap because skins are less dense than the liquid. This cap dries out unless the juice is pumped over or the cap is punched down into the juice regularly. We prefer to punch down as it does not involve pumps.

In 2016 we introduced four new smaller fermentation tanks designed to sit inside the glycol-cooled larger tank in a water bath. The first purpose was to allow fermentations in smaller batches. The second purpose was to allow early removal of skins and seeds before the fermentation is finished by introducing a basket sieve at the bottom of each tank. The third purpose was to allow for better temperature management during cold soak and fermentation. The tanks were custom-built again by Santa Rosa Stainless Steel.
The twice-daily cold soak/punch-down process is:
Lift the tank cover
Punch down the must to the extent possible.
Take out samples to taste and analyze.
Squeegee and wipe down the inside walls of the tank with disinfectant (weak KMBS solution on a paper towel), cover the must with a new blanket of Argon or CO2, and lower the tank cover.
We take two 2 ml samples and centrifuge them for 4 minutes at 13,500 rpm to measure the chemical properties. Then we use one sample for the OenoFoss instrument to measure Brix, Density, pH, VA, TA, Tartaric Acids, Gluconic Acids, Malic Acids, Alpha Amino Acids, and Ammonia. We use the second sample to measure phenolics: we measure the transparency at various wavelengths in the ultraviolet-to-visible spectrum and transmit the spectral data to wineXray.com, which instantly returns the phenolic results (Free and Total Anthocyanins, Anthocyanins Bound to Tannins, Protein-Precipitable Tannins and Total Iron-Reactive Phenolics). For a more detailed description of the process and the meaning of these measures, read the Laboratory section.
Data Management
We record data at least daily for all fermentations running simultaneously for a given harvest date with the “INPUT: Fermentation Actions by Harvest” layout. It can accommodate up to 8 simultaneous fermentation batches. This layout has five tabs: the first to input actions, the second to input measurements of chemical properties, the third to set the boundaries for the “MUF” (Must under Fermentation) calibration, and the fourth and fifth to review results graphically.
This screenshot shows the “Actions” tab of the input layout on October 14, 2017, at 6 pm, when we re-allocated the saignee on the vibration/berry sorting table from fermentation tanks 1, 2 & 3 to fermentation tank 4.

This screenshot shows the “Juice Analysis” tab at the same time

Note, we only have “ Must” readings in the chemical analysis because the fermentation had not started yet.
The other three tabs are irrelevant at this juncture.
Tracking Results 2020
As indicated in the process-flow graphic at the beginning of this page, we made the following choices in 2020:
We stomped all four fermentation batches (CS, CF-PV, Me1 & Me2).
We discarded the juice falling off the berry sorting tables – effectively a 7% saignee.
We made no additions of any sort (no water, acidity adjustment, stems or chips, SO2, Enzymes, or Fining Agents)
We used dry ice to cool down the berries as they fell into the respective fermentation tank, equivalent to a 1-day cold soak.
Over the years we have learned to minimize adjustments and interventions, by managing fruit characteristics in the vineyard and timing the harvest correctly. We now shy away from adding water or sugar, from adjusting acidity or using enzymes and SO2.
Previous page: Step #2: Harvest
Top of page: Go
Next Page: Step #12: Primary Fermentation Phase 1
Last updated: November 28, 2021