Step 12: Primary Fermentation Phase 1
Fermenting grape juice into wine is about transforming sugar into alcohol with yeast. This happens in a complex web of chemical reactions which are not yet fully understood. The level of Brix measured in grape juice translates linearly into the percentage of alcohol the wine will have: 24 Brix in must yields around 13.5% alcohol in wine.
Fermentations consist of two successive phases:
Phase 1: Lag & Exponential growth phase. First, the yeast microbes need to adjust to the environment (temperature, pH, etc.). As soon as the adjustment is complete, the yeast cells divide and grow in number exponentially while at the same time converting sugar. This takes a few days, during which significant energy is dissipated in heat, and rising temperatures and oxygen is consumed. Next, berries start to disintegrate, and skins begin to float up to create a cap that needs to be broken up and submerged with regular punch-downs.
Phase 2: Stable & Exponential Decline Phase. This is when the yeast cells systematically convert sugar into alcohol. CO2 is generated, and temperatures tend to fall because the fermentation’s energy dissipates. The cap of skins needs to be punched down regularly. The yeast cells start to die off when the sugar and other nutrition get scarce when the alcohol level gets too high, or the temperature falls too low.
A fermentation is called successful when all the sugar is consumed by the time the yeasts have died. The opposite is a stuck fermentation when sugars are still present after the yeasts die and new yeasts need to be added to restart the fermentation. This is cumbersome and can be prevented by managing temperatures and yeast nutrients and selecting the appropriate yeast strains for the grape variety at hand and winemaking style.
Choice of Yeasts
Different yeast strains produce different tasting wines even when applied to the same grapes. There are thousands of different yeast strains, many naturally available concurrently in the environment. So the challenge for the winemaker is to choose among three alternatives:
Fermentation with Indigenous Yeasts: We rely on the mix of yeast strains that happen to be attached to the berry skins brought in or survived in the winery from previous fermentations. This choice creates wines that genuinely reflect the local terroir, but there is a risk that the fermentation may not complete successfully.
Fermentation with Industrial Yeasts: We kill the indigenous yeasts with SO2 in Step #8 above and inoculate the must with a known, commercially available yeast or yeast derived from the own vineyard and propagated. This choice reduces the risks of stuck fermentations but adds uniformity to the wine produced.
Fermentations with both: We start with Indigenous Yeasts but then, in phase 2, introduce Industrial Yeasts to make sure the fermentation finishes without a hitch.
For our first vintage (2009) decided to go with a native fermentation to establish a benchmark for what happens without interventions. In the subsequent six years, 2010-15, we used commercially propagated yeasts to reduce the risks of stuck fermentations and record which yeasts were doing the fermentation. Then, as we gained more confidence in our ability to control the fermentation process, we returned to native fermentations in 2016.
Yeast Nutrient
The essential yeast nutrient is Nitrogen which is metabolized by yeast to synthesize proteins. Nitrogen stimulates yeast multiplication, keeps yeast metabolism active, prevents H2S and mercaptan formation, and stimulates aroma production. Nitrogen is provided as Yeast Assimilable Nitrogen (YAN). YAN is composed of ammonium ions and amino acids. Ammonium ions are the favorite ‘food’ of yeast. Easy and fast to use, ammonia impacts mainly yeast growth and population. Amino acids are harder to be assimilated. They impact yeast growth, health, and efficiency through fermentation as much as aroma production.
Berries contain YAN naturally. The optimal concentration for a healthy fermentation is between 150 and 350 mg per liter of must, depending on its sugar content. The rules of thumb are:
For good population growth of yeast, we need at least 150 mg/L of YAN
For converting sugars to alcohol, we need 10 mg/L/Brix of YAN (e.g., for must with a sugar concentration of 25 Brix, we need 250 mg/L of YAN)
Too much YAN (>350 mg/L) produces off-flavors and increases stress conditions, possibly leading to stuck fermentations.
Artisan winemakers prefer to minimalize the use of additives of any sort, including nutrients. We used no nutrients in 2009, then used them 2010 through 2015 as suggested by commercial yeast manufacturers. In 2016 and 2017, we used nutrients sparingly, only when fermentations showed signs of stalling. In 2018 through 2020, we added significant amounts of nutrients because the level of YAN in the must was very low, below 100 for the Cabernet Sauvignon blocks. In the future, our goal is to manage the vineyard to get the YAN to 150-200 mg/L, so we can minimize additions.
Process Steps for Primary Fermentation Phase 1
When we use commercial yeast and nutrients, we need to hydrate the yeast in a nutrient solution. Here are the steps we go through:
We make sure the must has an adequate concentration of nitrogen – food for the yeast. We measure YAN (Yeast Assimilable Nitrogen) and adjust yeast nutrients in the next step as required.
We hydrate the required amount of additional yeast nutrient in 2 liters of 104°F tap water as specified by the supplier.
We carefully hydrate the yeast in the solution; this process is essential to ensure that the yeast cells assimilate to the environment: We add the yeast, stir gently, and let the suspension stand for 20 minutes. Then we mix in 2 liters of grape juice and let the solution stand until it cools down to the temperature of the must in the fermentation tank + 15°F
We pour the acclimated solution into the fermentation tank and start the punchdowns.
When we go for native fermentation, we may set a bucket or two of crushed grapes aside a week earlier, punch it down daily, and watch for the fermentation to start indigenously. The bucket is ready to be used to inoculate the main fermentation tanks when the fermentation is active (i.e., producing enough CO2 to form a 1-2 inch cap in the bucket). The alternative is to wait until the fermentation starts on its own; this creates a “Warm Soak” waiting period of 3-4 days.
Here is the process chart:

We may want to add nutrients at inoculation, mainly if the YAN level measured in Step #6 above is below 120 mg/L.
During fermentation, we need to repeatedly remix the skins and the juice a) to promote extraction of essential flavors from the skins into the juice and b) to add minute amounts of oxygen required by the yeast. This can be accomplished by punch downs (punching the skins down into the juice) or pump-overs (pumping the juice from the bottom of the tank and spraying it over the cap). We prefer punchdowns because we don’t want to use pumps.
The punchdown process is:

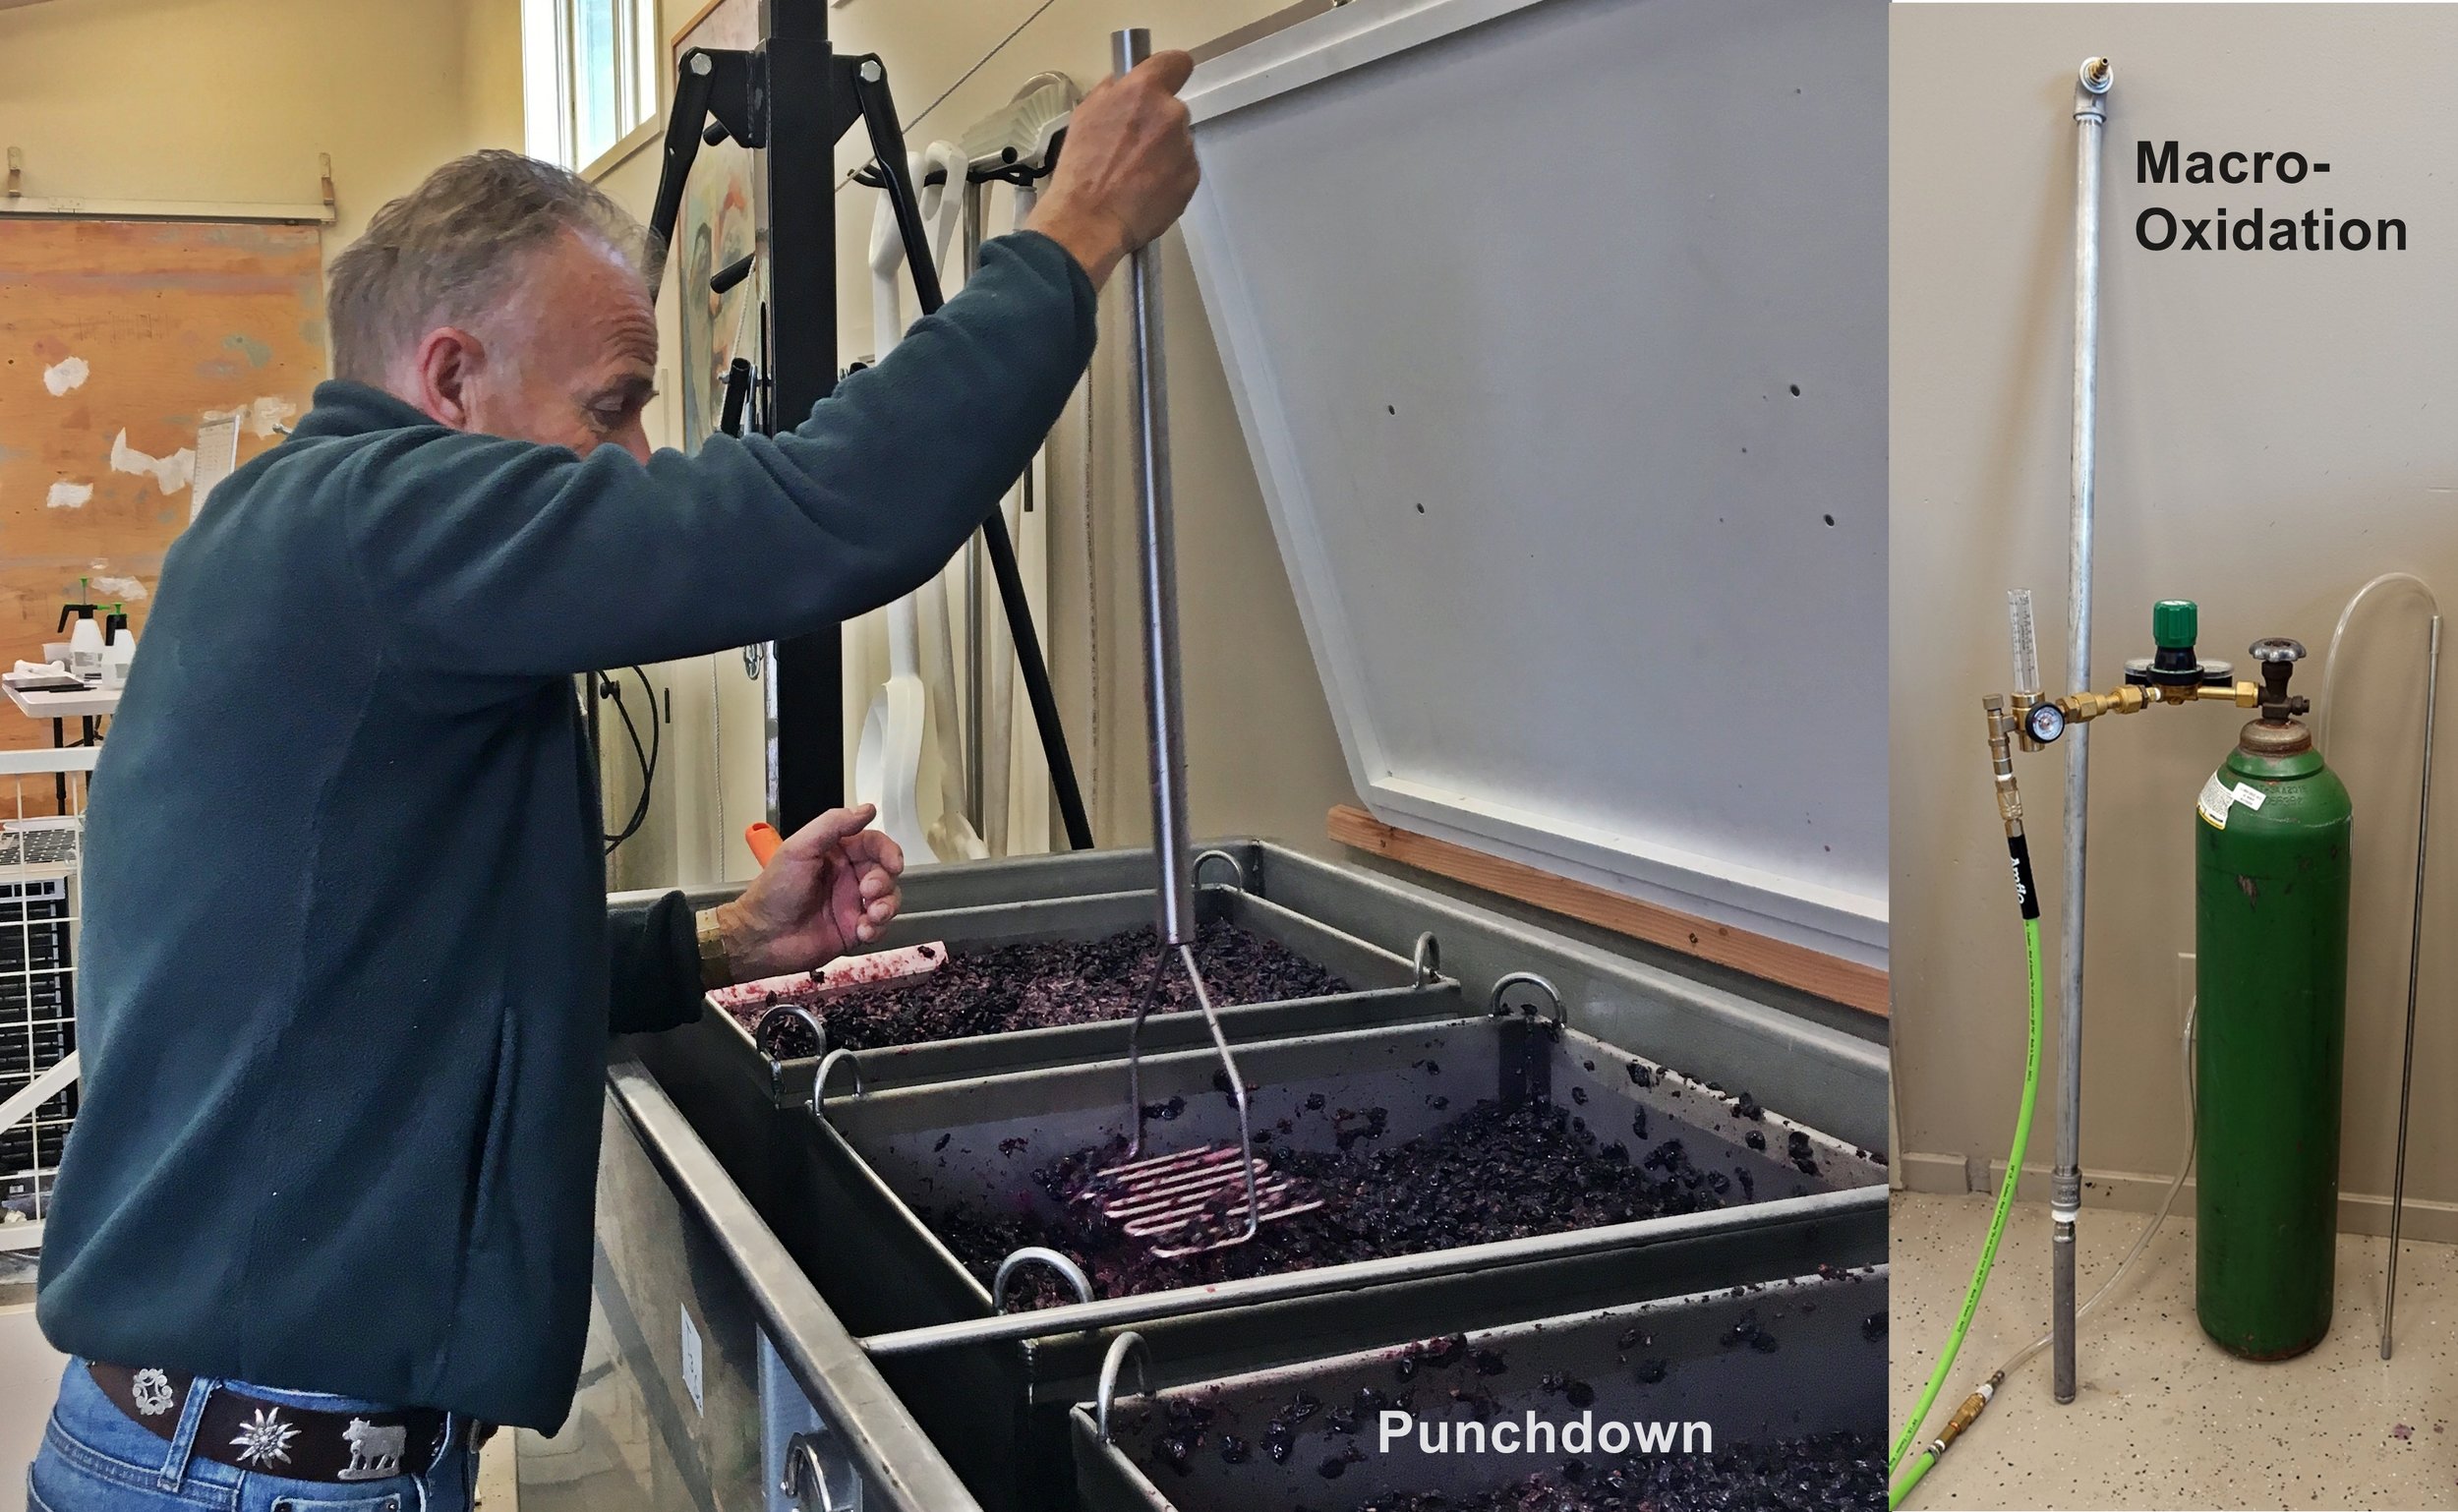
Three times a day, take the tank cover off and blow off the Argon or CO2 blanket with a fan
Punch down the cap making sure not to crush seeds at the bottom of the tank (picture on the right). Decide whether to increase the oxygen supply in the must further. If yes, macro-oxygenate once a day during the first 3 days: Inject 10-20 ppm of pure oxygen through a diffusion stone into the must (equipment - the picture on the right). Note, we can only measure the amount of oxygen injected, but not the amount that bubbles up and is not absorbed.We are currently exploring to monitor oxygen concentration in the must in real time by monitoring the Oxygen Reduction Potential (ORP) with a probe from Accuro Ltd, New Zealand (www.accuro.tech)
An alternative to punchdown is delestage. Delestage is the french term for draining the fermentation tank into a holding vessel, leaving the remaining skins exposed to air for 20 to 100 minutes, and then pour the contents of the holding vessel back over the skins into the tank. Delestage should not be repeated more than three times and should be followed by a punchdown at least 16 hours later. (see this article for a good description https://winemakermag.com/237-delestage-fermentation-techniques ). Note, we cannot measure the amount of oxygen supplied in the Delestage process.
Take another tasting sample and comparison taste.
Take two 2mL samples for chemical analysis once a day. Enter results into new records of the FermentationActions table.
Squeegee and wipe down inside walls of the tank with disinfectant (KMBS solution on a paper towel), cover the must with a new blanket of Argon or CO2, if the fermentation is not yet producing enough CO2 itself, and put the tank cover back on
Adjust heating or cooling to keep the temperature in 70-80 °F range
Around 3-4 days following inoculation, we expect to see a peak in the level of Free Anthocyanins (hopefully above 1,000) and sugar levels having dropped 1/3rd in Brix. At this point, we move on to Fermentation Phase 2.
Dealing with Fermentation Problems
A long lag phase or abrupt stop in the conversion of sugars to alcohol indicates a problem. An abrupt stop in fermentation activity can happen as a consequence of a severe temperature drop – no longer an issue for us since we can control the temperature in our fermentation tank. A problematic delay in the onset of fermentation activity is indicated when the lag phase is longer than five days. This can happen when:
A native fermentation is attempted with indigenous yeasts. It may help to raise the temperature, but it is safer to switch to inoculation with industrial yeast instead.
The yeast used for inoculation did not develop properly. This can be confirmed by counting the density of viable yeast cells under a microscope. It should have reached 10 to 100 million cells / mL - an analysis better left to a commercial lab (e.g., Enartis). The remedy is to re-inoculate
There is a nutrient deficiency as indicated by low YAN levels relative to the Brix level of the must. The remedy is to add more yeast nutrition.
There are toxins or spoilage microbes in the must. This can be confirmed by lab analysis of the must revealing excess SO2, pesticides, copper or iron residuals, or spoilage microbes. For example, if the analysis indicates Lactic Acid Bacteria as spoilage microbes, then the must should be treated with Lysozyme and SO2. If the analysis indicates non-microbial toxins, then fining is recommended with Bentonite, yeast hulls, or an industrial product like Enartis Cellferm.
When restarting a fermentation, it is advisable to use a special yeast that ferments vigorously and can adapt to high alcohol, high volatile acidity, and low nutrition needs.
Data Management
Data management is identical to what we described in Steps 3-11, with one exception. We measure the chemical properties twice, using both the “Must” and the “MUF” settings on the OenoFoss equipment. This is because the measurements for MUF (Must Under Fermentation) are not calibrated and need to be interpolated to calibrated Must-measurements. The following screenshot shows the “Juice Analysis” tab for October 19, 2017, at 10 am.

Tracking Results for 2020
We made the following choices in 2020.

We had four fermentation batches, one for each of the Merlot batches, one large one for the Cabernet Sauvignon, and one for the mix of Cabernet Franc and Petit Verdot Petit. In all instances, we waited 2-4 days until the fermentation started on its own but had to add significant amounts of nutrition 500 -1500 ppm) to compensate for the low YAN levels (85 – 175 ppm). We used Microessentials from Gusmer. We reached one-third of sugar depletion in 2-3 days before the Anthocyanins peaked. We infused between 8-11 ppm of pure oxygen. We had a problem with the Cabernet Sauvignon fermentation: it overheated probably because excessive injection of oxygen accelerated the growth of yeast cells. The picture illustrates the overflowing tank.
We will review the results at the end of Step 17.
Previous page: Steps #3-11: Upfront Winemaking Decisions
Top of page: Go
Next Page: Step #13: Primary Fermentation Phase 2
Last updated: November 27, 2021