Winery Overview
Winemaking is about transforming healthy and clean grapes into young, immature wine, a 3-4 month process. This is the step after growing quality grapes, an annual endeavor. The step after winemaking is cellaring, which is about maturing the young wine in barrels, bottling the wine, and maturing the bottles – that takes 5-8 years
This section is organized as follows:
On this page, we explain the general concepts and processes used. We start with a simplistic view, then describe our winemaking facility and then summarise the 15 individual process steps. We conclude with a summary of how we made the wine in each of the past eleven years, 2009 – 2020.
On the following pages, we describe the process steps in more detail and how they apply in the last harvest (2020), what decisions we made and what we learned.
A very simplistic view
In a very simplistic view, making red wine has three distinct phases:
·Phase 1 - from grapes to sweet must:
First, we decide when we pick grape bunches in the vineyard. Then we sort out the bad bunches, destem the remaining good ones, sort out debris and dirt and crush the grapes into a sweet must. Must is a slurry of grape juice, grape skins, and seeds. Phase 1 takes 6-8 weeks of monitoring grapes in the field and a few hours of picking and processing the grape bunches.Phase 2 - from sweet must to alcoholic must
We ferment the sugar with the help of yeasts into alcohol. During this process, many valuable organic compounds are extracted from the skins, pulp, and seeds. These compounds give the wine its characteristic odors, taste, and mouthfeel. This phase takes 2-3 weeks and is the most critical and challenging of the three.Phase 3 – from alcoholic must to juvenile wine
We separate the now alcoholic juice from the skins and seeds by pressing the must into settling tanks. This takes a few hours
The facility
To go through these three phases, we need a special-purpose facility: a winery. We built our facility on four levels, so we do not need to use pumps – we rely on gravity to move the product and winches or lifts when required. The rationale is to prevent the rough physical treatment of juice, skins, and seeds inside a pump. This graphic illustrates the sequence:

A brief explanation covering the entire winemaking and cellaring process:
On the Bunch Sorting Table, we sort out the damaged bunches and leaves coming in from the vineyard
The Elevator moves the sorted bunches to the mouth of the destemmer
The Destemmer separates the grapes from the stems
On the Berry Sorting Table, we pick out the “Material Other than Grapes” or MOG, mostly small stem and leaf pieces
As the berries leave the Sorting Table and fall into the Fermenter; we have the option of inserting a Crusher which breaks their skin so valuable compounds can be extracted more efficiently during fermentation
In the Fermenter, we convert Grapes into Fermented Must (i.e., sugar into alcohol). The Fermenter is temperature-controlled by a Glycol Cooler pumping cold or warm glycol through the Fermenter walls.
The Press separates the juice (i.e., wine) from the grape skins and grape seeds.
Finally, we drop the young wine into a Mixing Tank in the cellar. During the cellaring process, covered in the next section, the young wine is moved back and forth between Barrels until it is matured and bottled. The mixing tank and barrels can be moved up or down to allow gravity-flow between them. The temperature in the cellar is kept at 55-60 dF by the Glycol Cooler pumping cold glycol through an air-conditioner.
To the left of the graphic is a picture of the physical layout. You can see the ground level outside through the window, and you can see cellar levels -1 and -2. Half the floor between level -1 and -2 is removable to connect the fermenting tank with a bridge to the press. This is shown on the page explaining the press. Cellar level -3 is below. We move the wine by a hose through holes in the floor to the mixing tank and barrels below..
Overview of the process

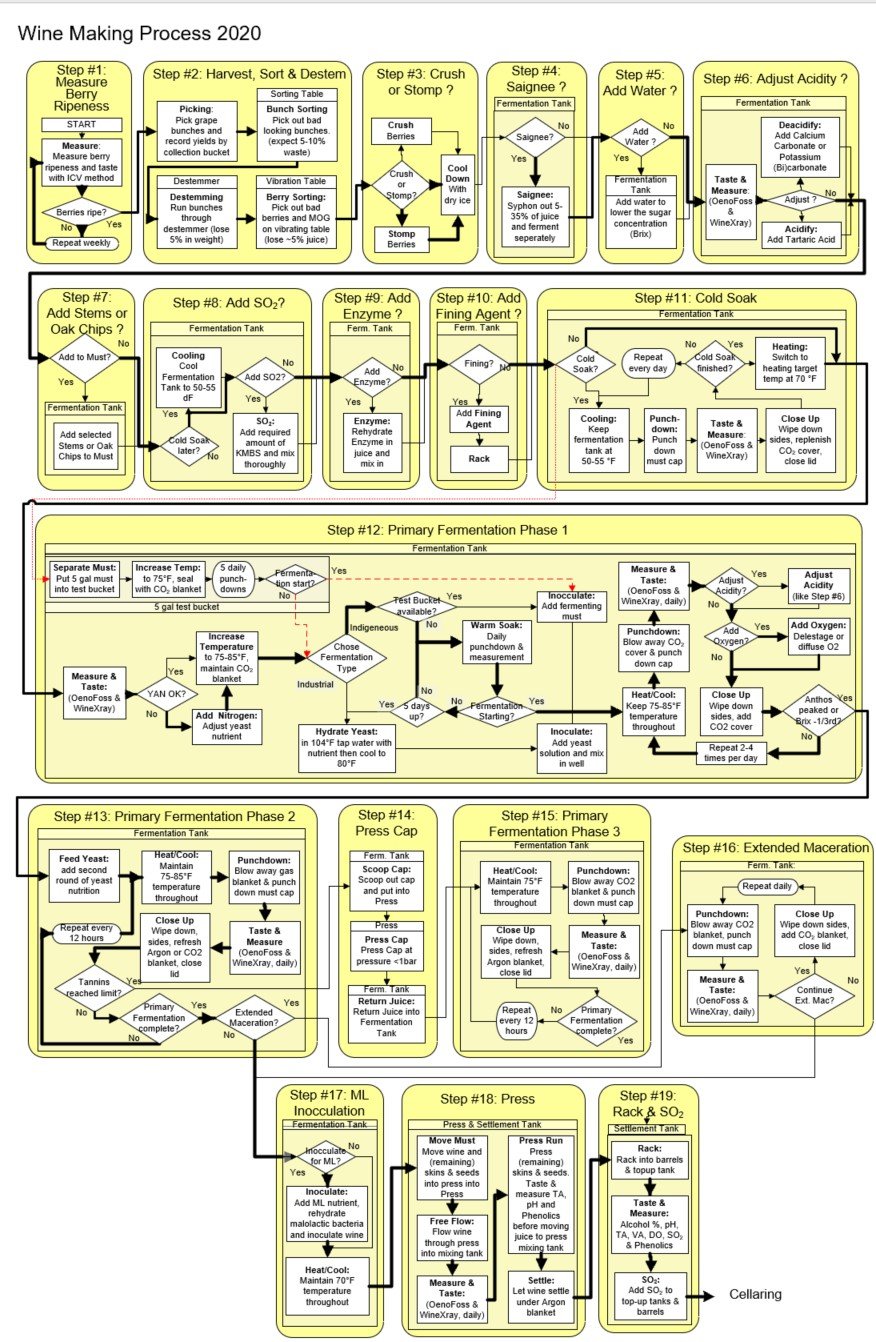
Here is the next level of detail: a closer look at the three phases described above. Note, this process has evolved significantly over the years; what follows is our process for the 2020 vintage and after. Before we start any activity, and at the end, we need to clean all equipment and facilities thoroughly – this is step #0. The flowchart on the right shows 19 process steps that follow and the decisions which link them:
1. Measure Berry Ripeness: We measure the progress towards grape maturity in the vineyard and then decide when to harvest.
2. Harvest, Sort & Destem: We pick the grape bunches, sort out the dirt, destem them, sort the berries end up with clean grape berries in a fermentation tank.
3. Crush or Stomp: We decide whether we want to break the skins of the grapes with rollers (crush) or with our feet (stomp) or not at all (i.e., Full Berry Fermentation)
4. Saignée? We decide whether we want to increase the concentration of flavors in the wine artificially. We do this by increasing the “skins & seeds”-to- “liquids” ratio by siphoning off some juice. We can use this excess juice to produce rosé wine.
5. Adjust Brix: We decide whether we need to lower the sugar level by adding water.
6. Adjust Acidity: We decide whether we need to adjust the pH up (add carbonates) or down (add tartaric acid). This adjustment can be made upfront (i.e., as step 6) or later (i.e., during fermentation or cellaring) in increments.
7. Add Stems or Oak Chips: We decide whether we want to add back some of the stems to adjust the flavor profile or add Oak Chips to adjust the phenolic extraction.
8. SO2 or native Fermentation: We decide whether we want to ferment with yeasts and bacteria native in the vineyard and winery or with cultured yeasts purchased from external providers. If we decide to use cultured yeasts, we add SO2 to kill off all native non-saccharomyces yeasts and bacteria.
9. Enzymes: We decide whether we want to add enzymes to break down cell walls. This speeds up the extraction of desirable components from the skin, pulp, and seeds into the must. An alternative, but less effective, is to add blocks of dry ice – freezing on contact shatters the skins.
10. Add Fining Agents: We decide whether we want to add antimicrobial agents to bind and precipitate spoilage bacteria.
11. Cold Soak: We decide whether we want to extract desirable components of the skin and pulp into the grape juice before fermentation is converting the juice into alcohol. Again the idea is to get more aromas and flavors. We soak at a low temperature of around 50-55 oF to limit spoilage.
12. Fermentation Phase 1: Now, we raise the temperature of the must to 70 dF and decide whether to start fermenting with native yeasts living in the vineyard and the cellar or industrial yeasts purchased from third parties. We generally prefer native fermentations; we simply wait for the fermentation to start on its own. Alternatively, we mix in a bucket of must, which we had set aside a week or so earlier and successfully started fermenting on its own. If we decide for industrial, yeast we inoculate the must with cultured yeast. In either case, we consider adding nutrients for the yeast, depending on the level of Yeast Available Nitrogen (YAN) in the must.
13. Fermentation Phase 2: After the fermentation accelerates and the sugar level has fallen by around a third, we have a few decisions to make. If we started with native yeasts, we might decide to finish with industrial yeasts and inoculate. Also, more yeast nutrients and an injection of oxygen may be required. Because fermentation releases thermal energy, we may also need to cool the tanks so the temperature stays below 90 oF. At the same time, we need to start watching the amount of phenolics extracted from the skins and pulp. If the tannins extracted exceed the anthocyanins extracted by more than 10-20% before the fermentation is complete, we decide to press the cap separately to limit further tannin extraction while completing the primary fermentation (steps 14 & 15). Alternatively, we proceed to step 16.
14. Press Cap Separately: We scoop out the cap (mostly skins floating on top of the must), press it, and then pour the resulting juice back into the fermentation tank.
15. Primary Fermentation Phase 3: we complete the primary fermentation, i.e., wait until all the sugars have been converted to alcohol.
16. Extended Maceration: If the fermentation has completed before tannins have reached 110% of peak anthocyanins, we decide whether to extend the time the now fermented juice is exposed to the grape skins - and, more importantly, the seeds - to extract even more phenolics (i.e., primarily tannins).
17. Malolactic Fermentation: We decide whether we want to innoculate the now young wine with malolactic bacteria to convert the malic acids into lactic acids. To facilitate the malolactic fermentation, we raise the temperature to around 65dF.
18. Press: We separate the juice from the skins and seeds by first letting the young wine flow out of the fermentation tank into the settling tank (called “Free Flow”) and then pressing the remaining wet must into the same tank and other containers (called “Press Run”). We dispose of the remaining, now dry, skins & seeds in the field to fertilize the soil.
19. Rack into Barrels: After letting the wine settle for a few days in the mixing or other settlement tanks, we rack the juice into barrels and topup tanks, leaving the sediment behind.
Steps 1 through 19 take between 10 and 30 days.
.Up to 2015, we implemented this process for a single grape variety, Cabernet Sauvignon. In 2016 we started dealing with four different grape varieties (Cabernet Sauvignon, Merlot, Petit Verdot, and Cabernet Franc), each possibly reaching harvest maturity at a different date. So we have up to four processes running simultaneously, slightly staggered time-wise.
Following is a detailed flowchart of the process and the decisions taken for each of the four harvests in 2020. The only purpose of showing this chart upfront is to illustrate how the steps and decisions described in the following pages fit together. The bold arrows indicate the decisions taken. We describe the individual steps in the pages which follow.
Wine Making Summaries
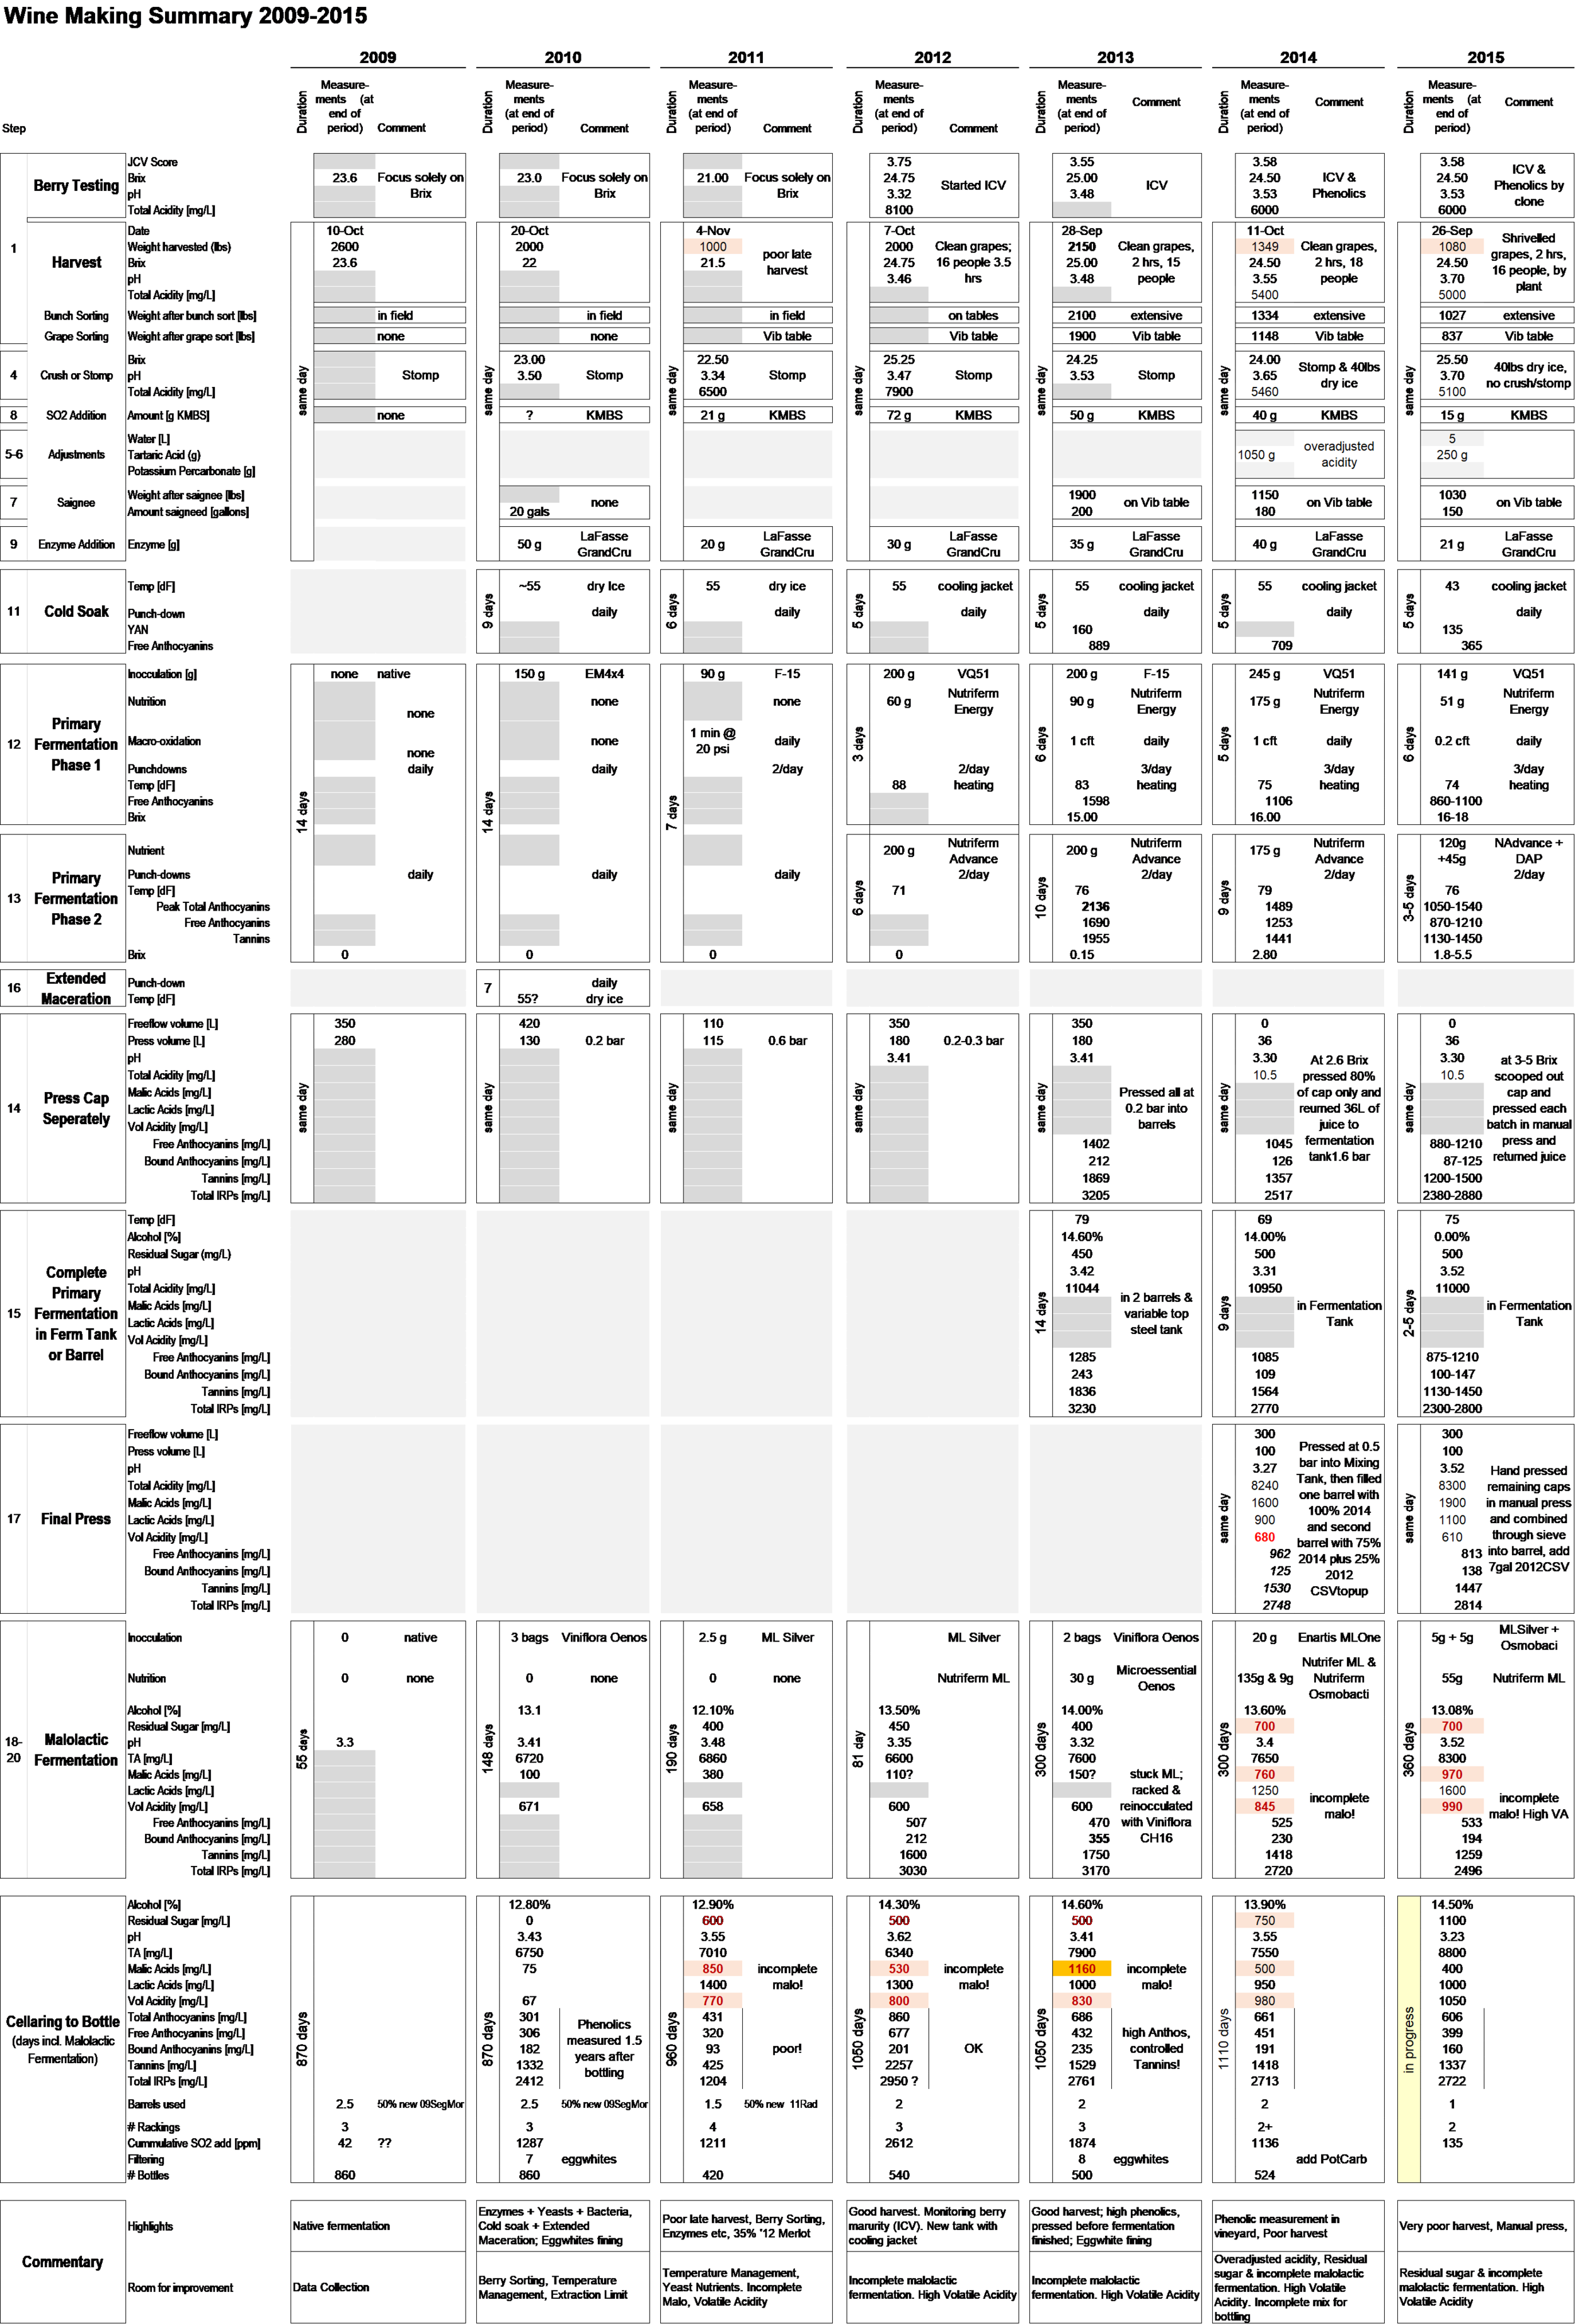
The following table summarises how we made wine during the first seven years, 2009 – 2015
During the first three years, I relied heavily on Aran Healy, who helped me decide what equipment to buy and taught me how to use it and make wine. We took relatively few measurements, relying mostly on Aran’s experience and tasting skills. The first year was about setting a benchmark: producing the wine with minimal additions and interventions in a 100% natural fashion. In the second and third year, we started experimenting with established winemaking techniques (like using commercial enzymes and yeasts). In the third year, we were particularly challenged by a bad harvest (low volume and quality of grapes)
During the following two years, 2011 & 2012, after Aran left, we became more numbers-oriented and diligently collected more data.
In 2013 David Fenyvesi joined, contributing his Hungarian winemaking experience. We started to measure phenolics with the help of WineXray, a service that converts spectral absorbance measurements into estimates of phenolic compounds in the wine. This, in turn, allowed us to fine-tune the fermentation process. We also started to document the winemaking process with a detailed flowchart and collected data more diligently.
In 2014 we started to measure the phenolics in grapes after veraison to help to time the harvest better. We pressed the cap separately and before fermentation was finished to limit the uptake of tannins.
In 2015 we fermented the different clones separately in bins within the fermentation tank – this proved that the 337 clone was of higher quality than the Rixford clone (in term of extractable Anthocyanin concentrations)
By 2016 the new Upper Vineyard started to produce and, because Merlot matures a month earlier, we started running two harvests and two rounds of fermentations in sequence. We introduced new smaller fermentation tanks to fit inside the large tank to handle smaller lots, and we built a small crusher because stomping in new tanks became infeasible. Nicolas Vonderheyden replaced David, adding his Bordeau winemaking experience to the mix. This and input from UCDavis encouraged me to return to the more natural approach we had used in 2009: no enzymes, no sulfur, and no commercial yeasts.
The process became more complicated. The graphic illustrates the difference between 2015 and 2016. In 2015 we had one harvest (cabernet), split the grapes into three fermentation buckets (by clone), and combined the fermented juice at press into a single barrel. In 2016 we harvested and fermented the grapes in the Upper Field (Merlot, Cab Franc & Petit Verdot) first in a single tank, used only the freeflow, and set the wine aside. Then we harvested the Lower Field. The long row grapes (337 clones) were saigneed and fermented in 4 separate fermentation tanks, and their freeflow combined with the free flow from the Upper Field into 2 barrels. The grapes from the short rows (Rixford clone) received the saignee from the long row grapes, were fermented in 2 separate fermentation tanks, then pressed together with the remaining skins of the long row grapes and filled one barrel.
By 2016 the new Upper Vineyard started to produce and, because Merlot matures a month earlier, we started running two harvests and two rounds of fermentations in sequence. We introduced new smaller fermentation tanks to fit inside the large tank to handle smaller lots, and we built a small crusher because stomping in new tanks became infeasible. Nicolas Vonderheyden replaced David, adding his Bordeau winemaking experience to the mix. This, and input from UCDavis encouraged me to return to the more natural approach we had used in 2009: no enzymes, no sulfur and no commercial yeasts.
The process became more complicated. The graphic illustrates the difference between 2015 and 2016. In 2015 we had one harvest (cabernet), split the grapes into three fermentation buckets (by clone) and combined the fermented juice at press into a single barrel. In 2016 we harvested and fermented the grapes the Upper Field (Merlot, Cab Franc & Petit Verdot) first in a single tank, used only the freeflow and set the wine aside. Then we harvested the Lower Field. The long row grapes (337 clones) were saigneed and fermented in 4 separate fermentation tanks and their freeflow combined with the free flow from the Upper Field into 2 barrels. The grapes from the short rows (Rixford clone) received the saignee from the long row grapes, were fermented in 2 separate fermentation tanks, then pressed together with the remaining skins of the long row grapes and filled one barrel.

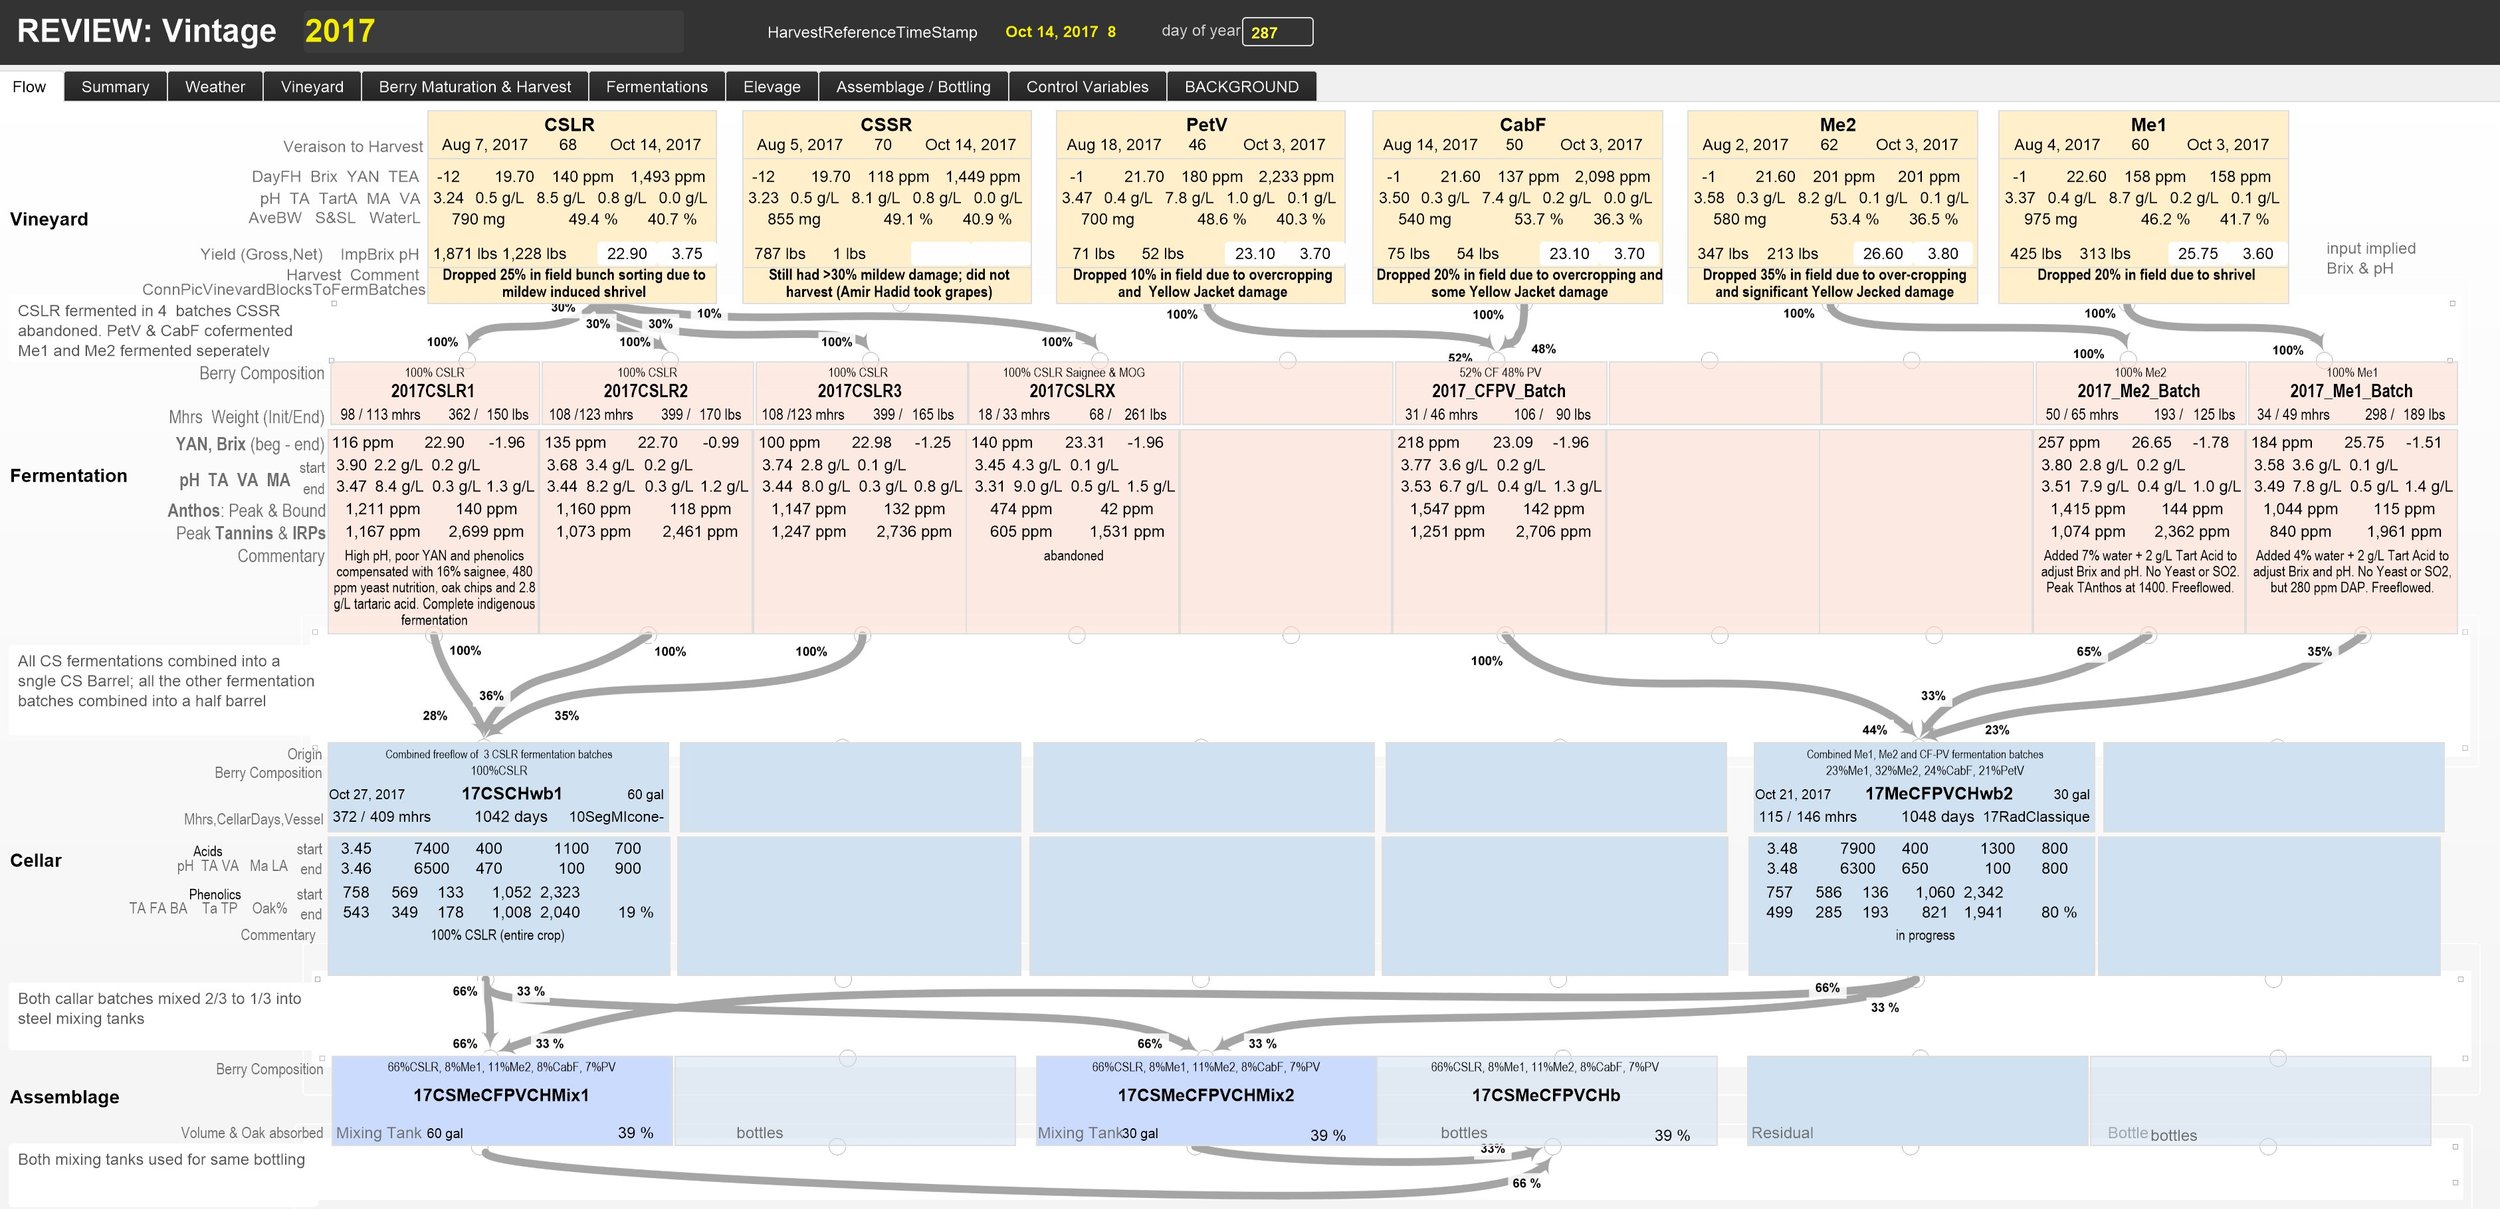
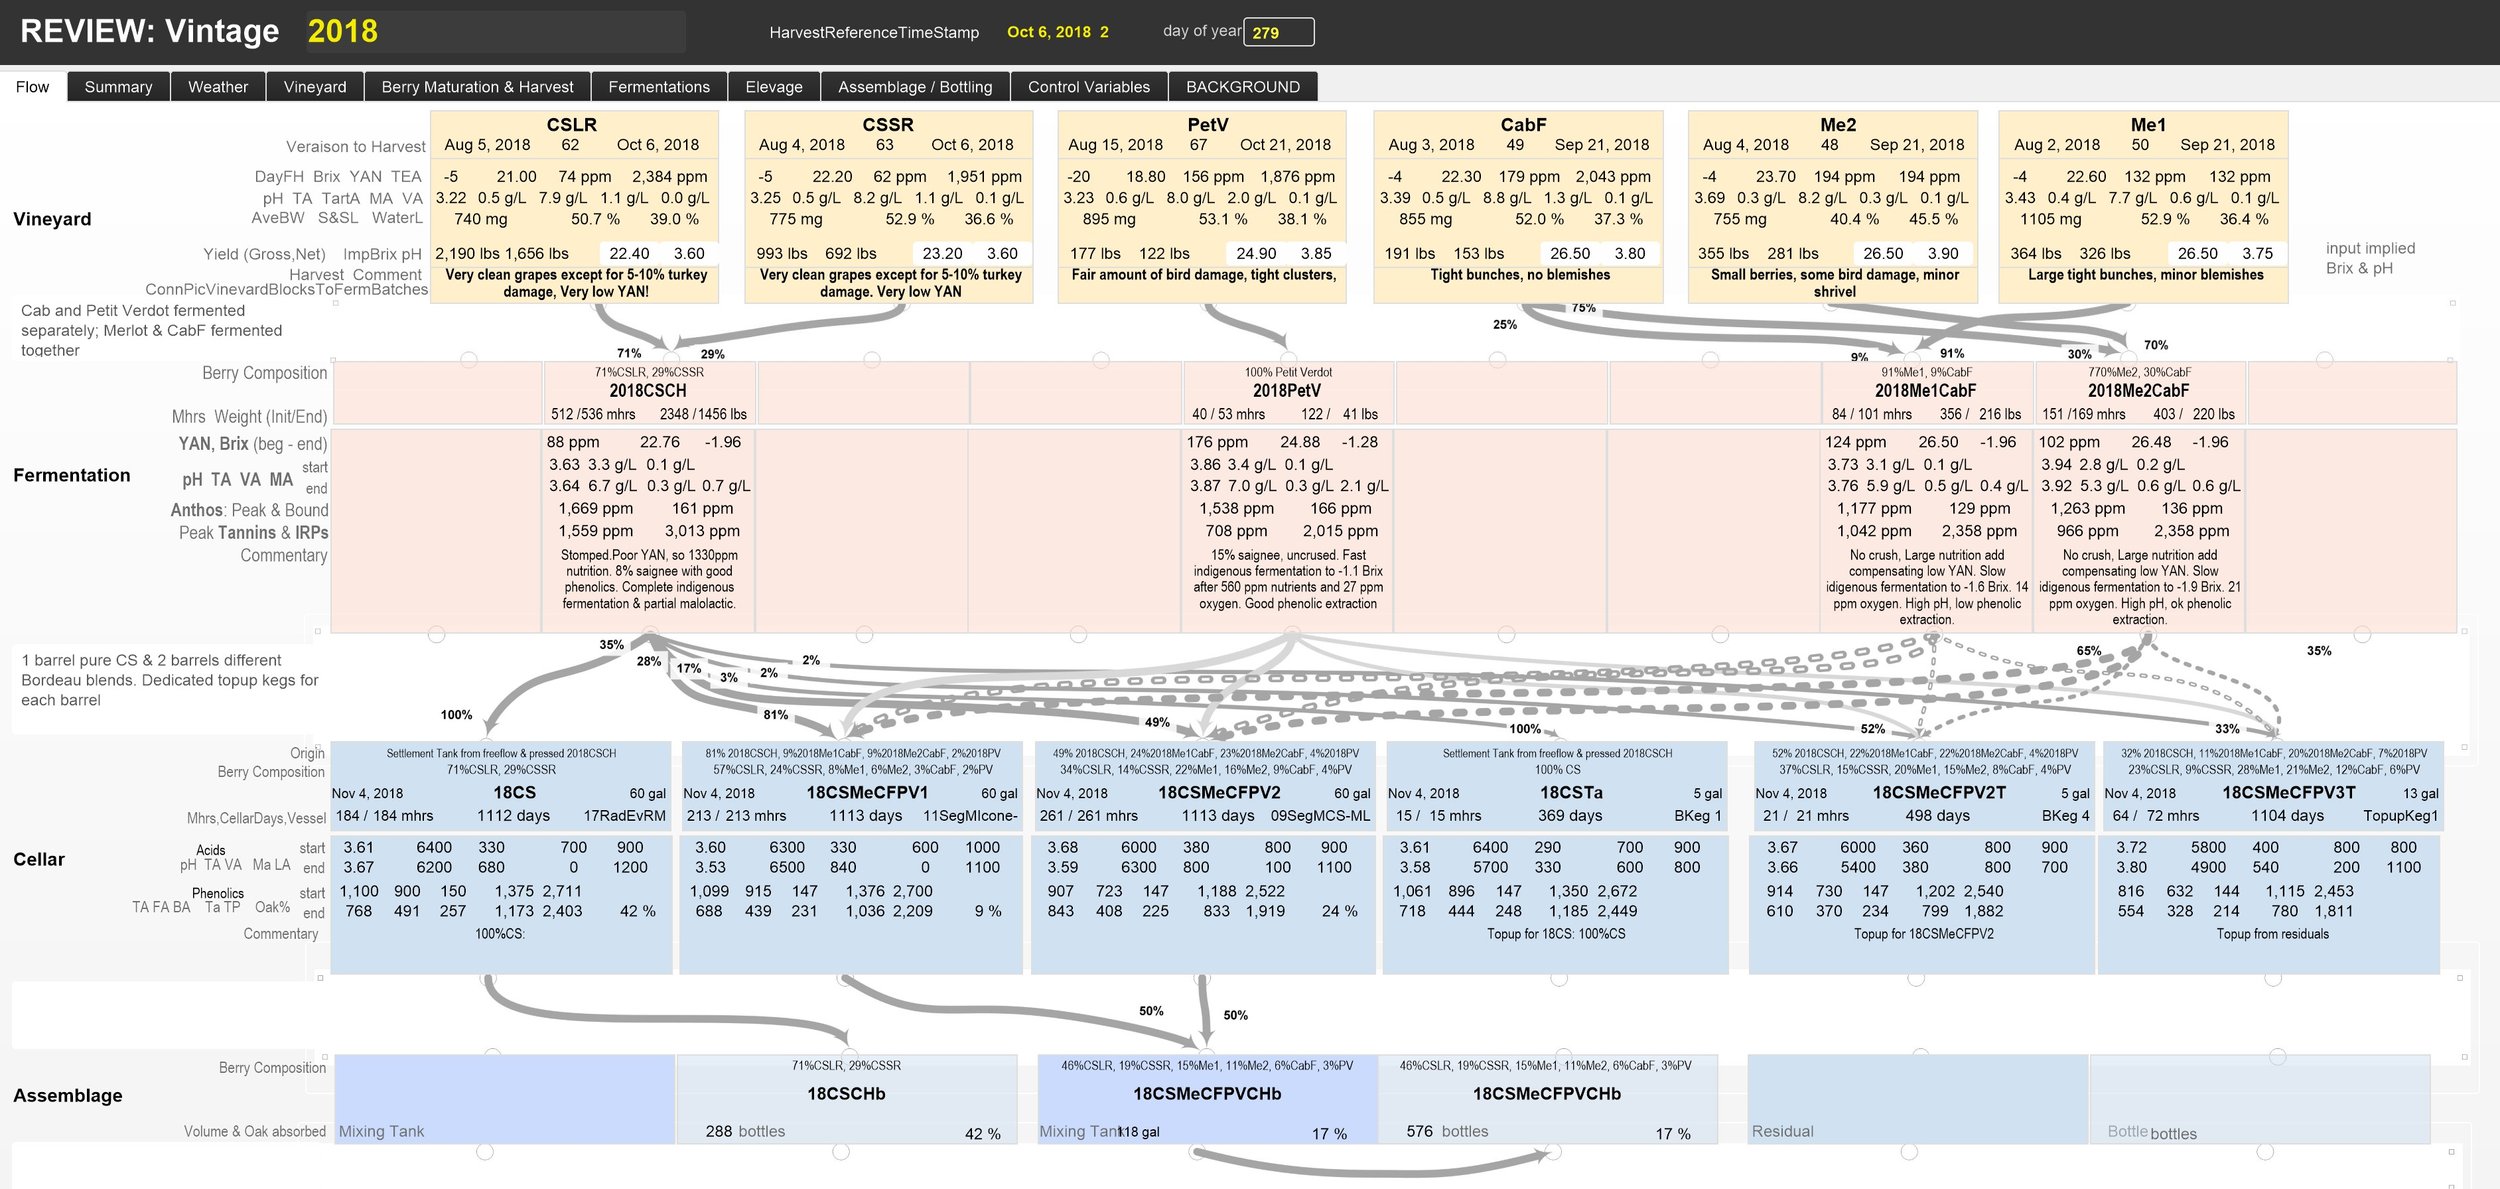
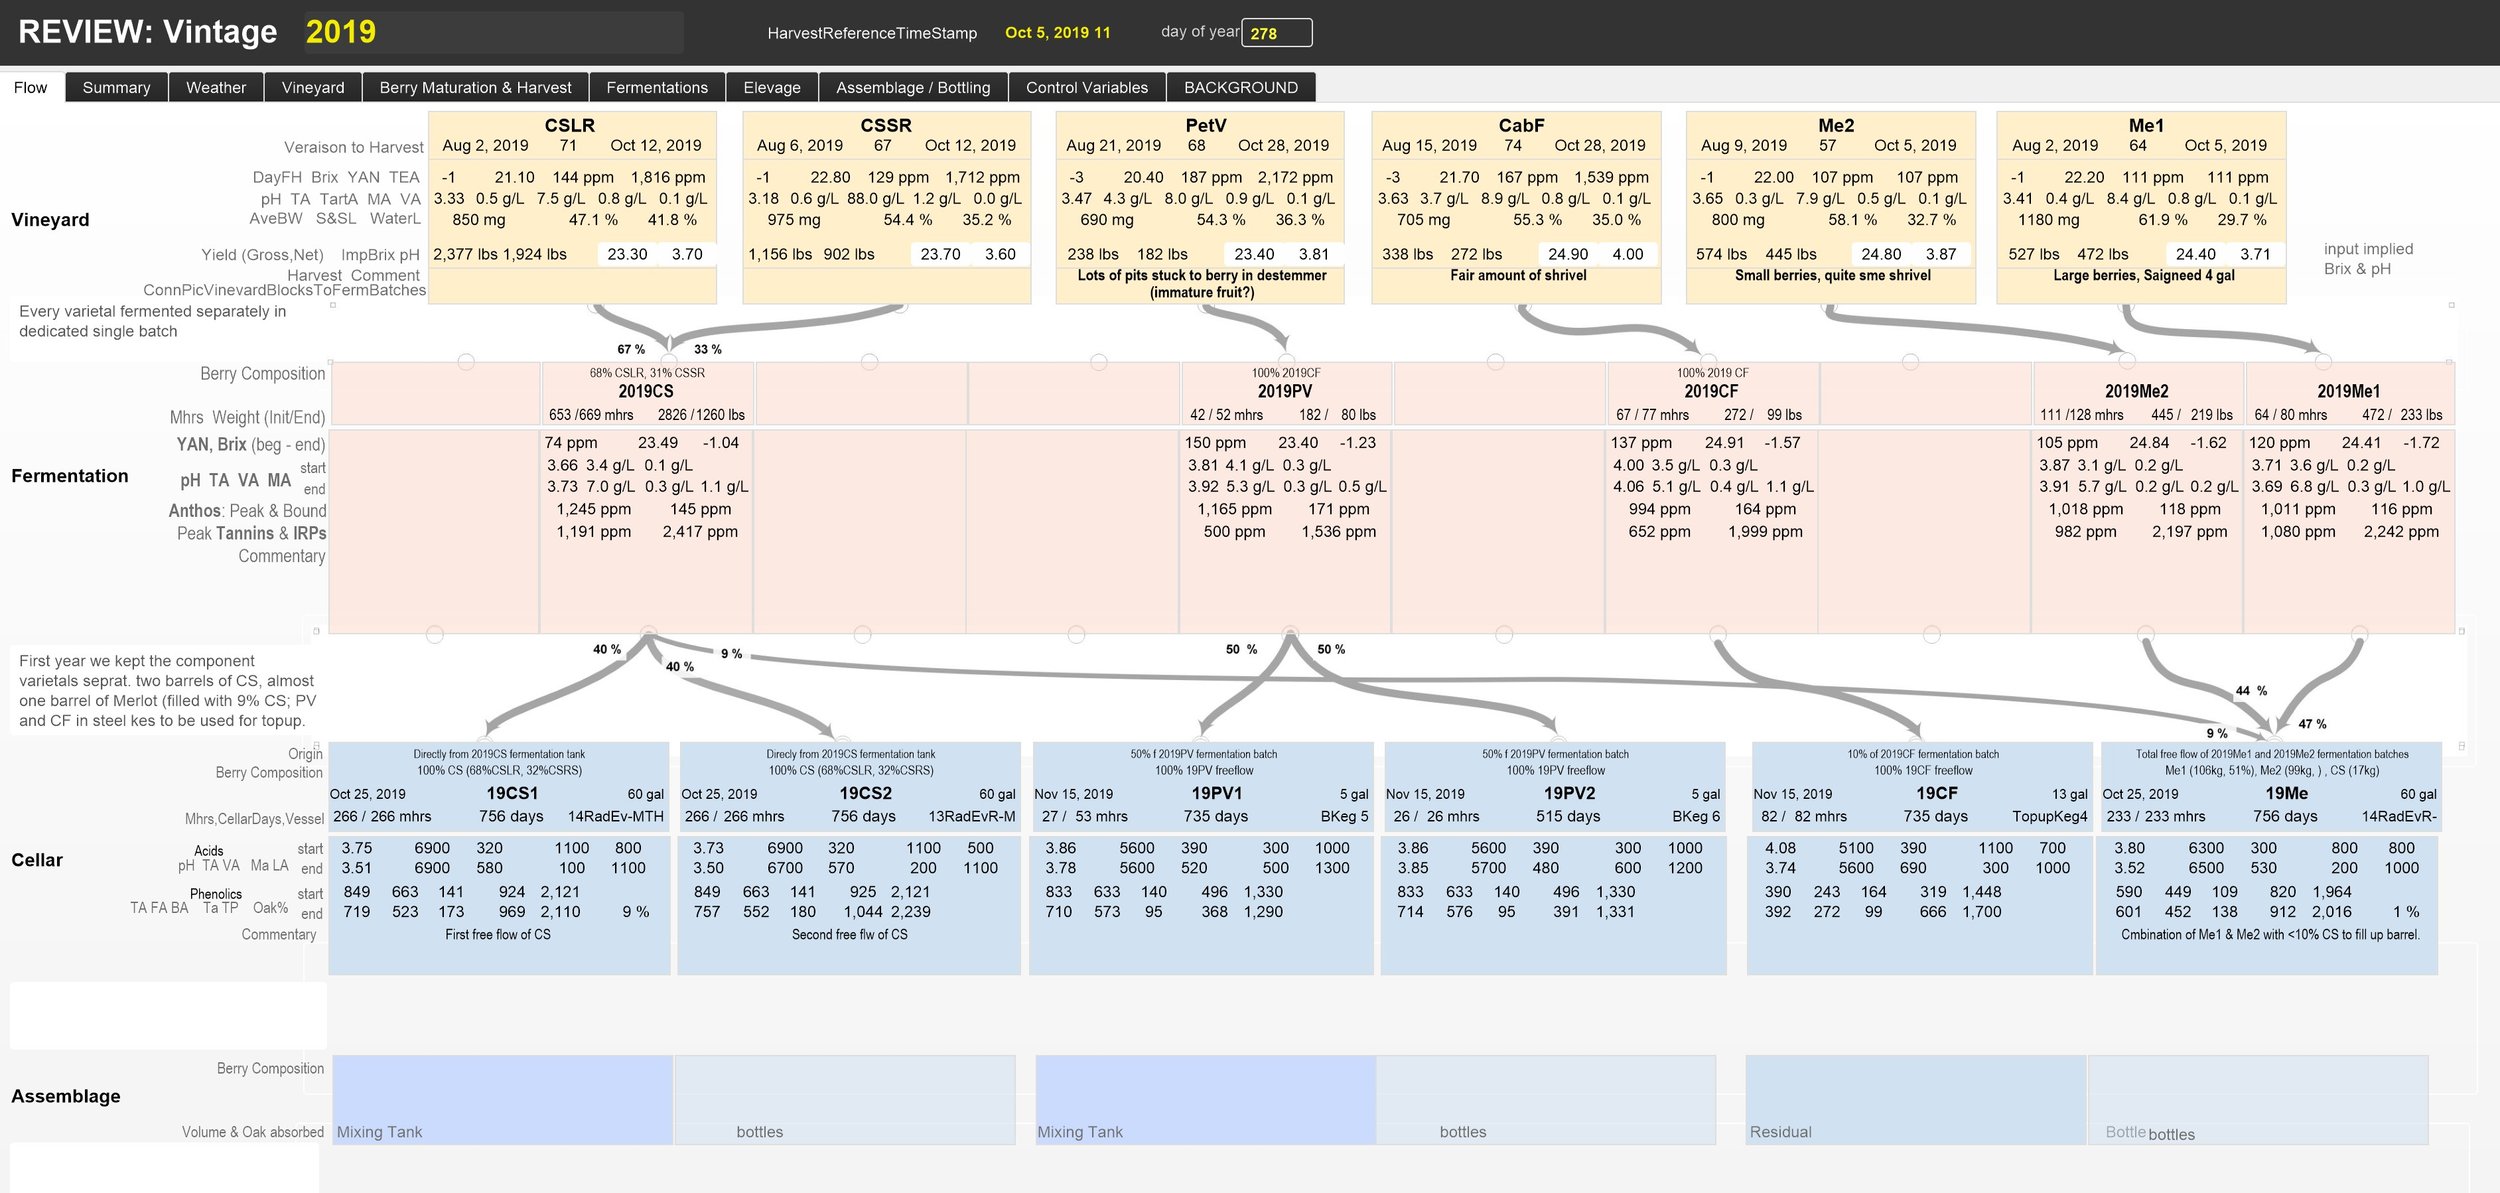
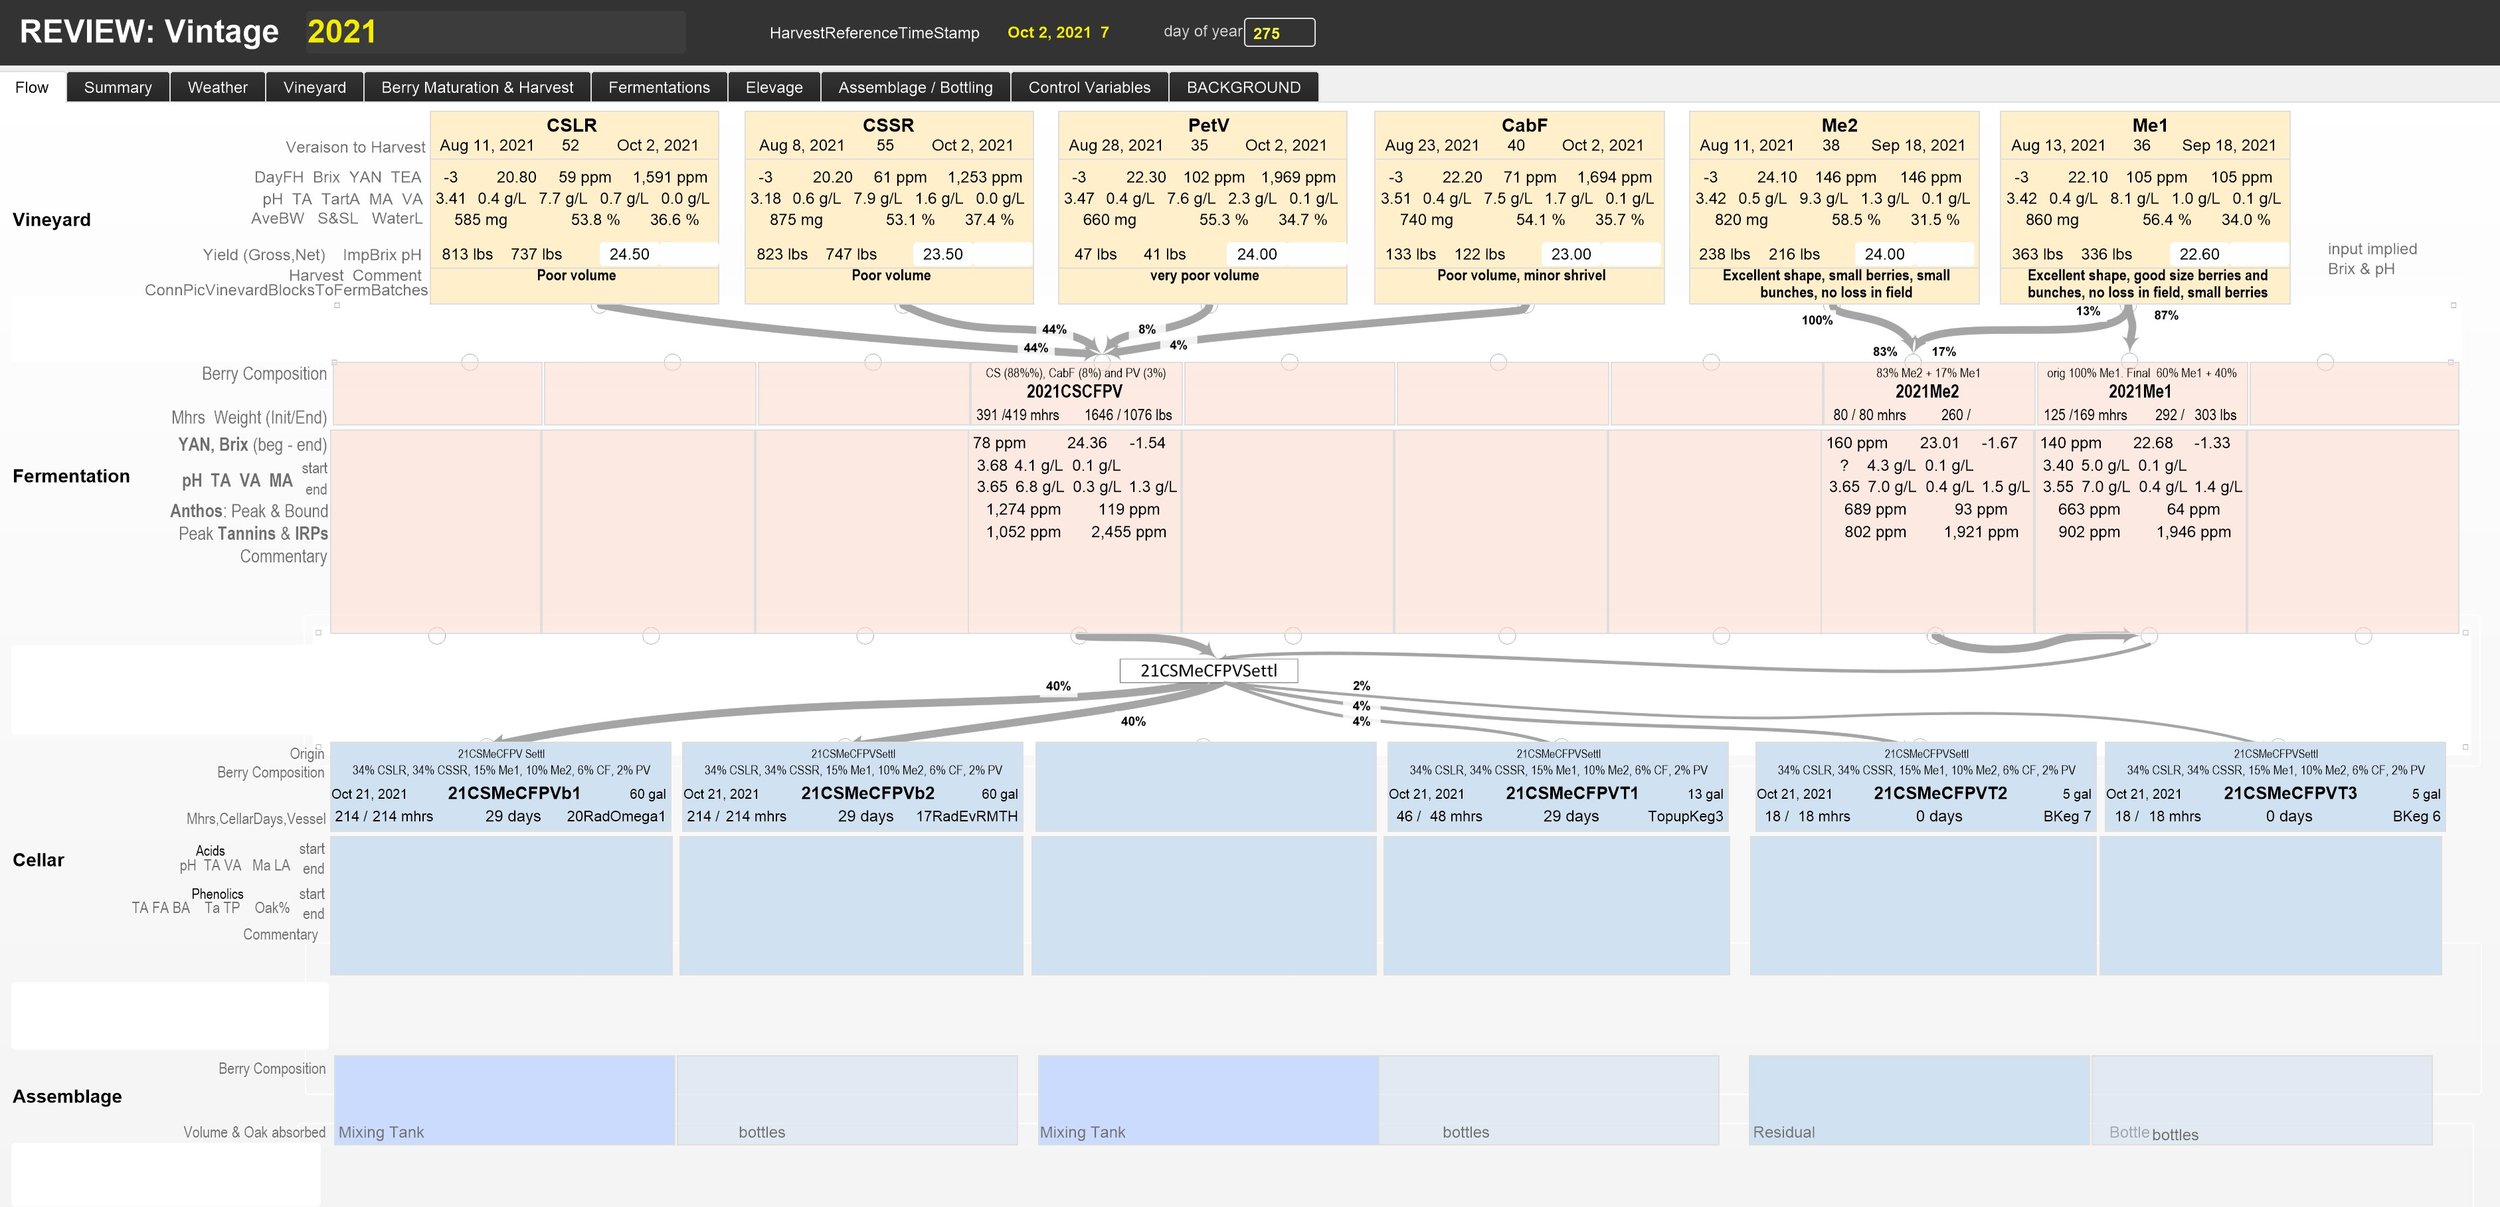
In 2017 we reached a limit in what we could handle with spreadsheets and decided to replace them with a relational database. The following pictures show screenshots of the “REVIEW Vintage”-layout for 2016 through 2020. Each shows in the orange top row the different harvest blocks, in the pink second row the different fermentation batches, and in the blue third row the different cellar batches. The boxes in the rows are connected with arrows indicating the flows between them. Each box shows critical measurements at the beginning and end of each step.
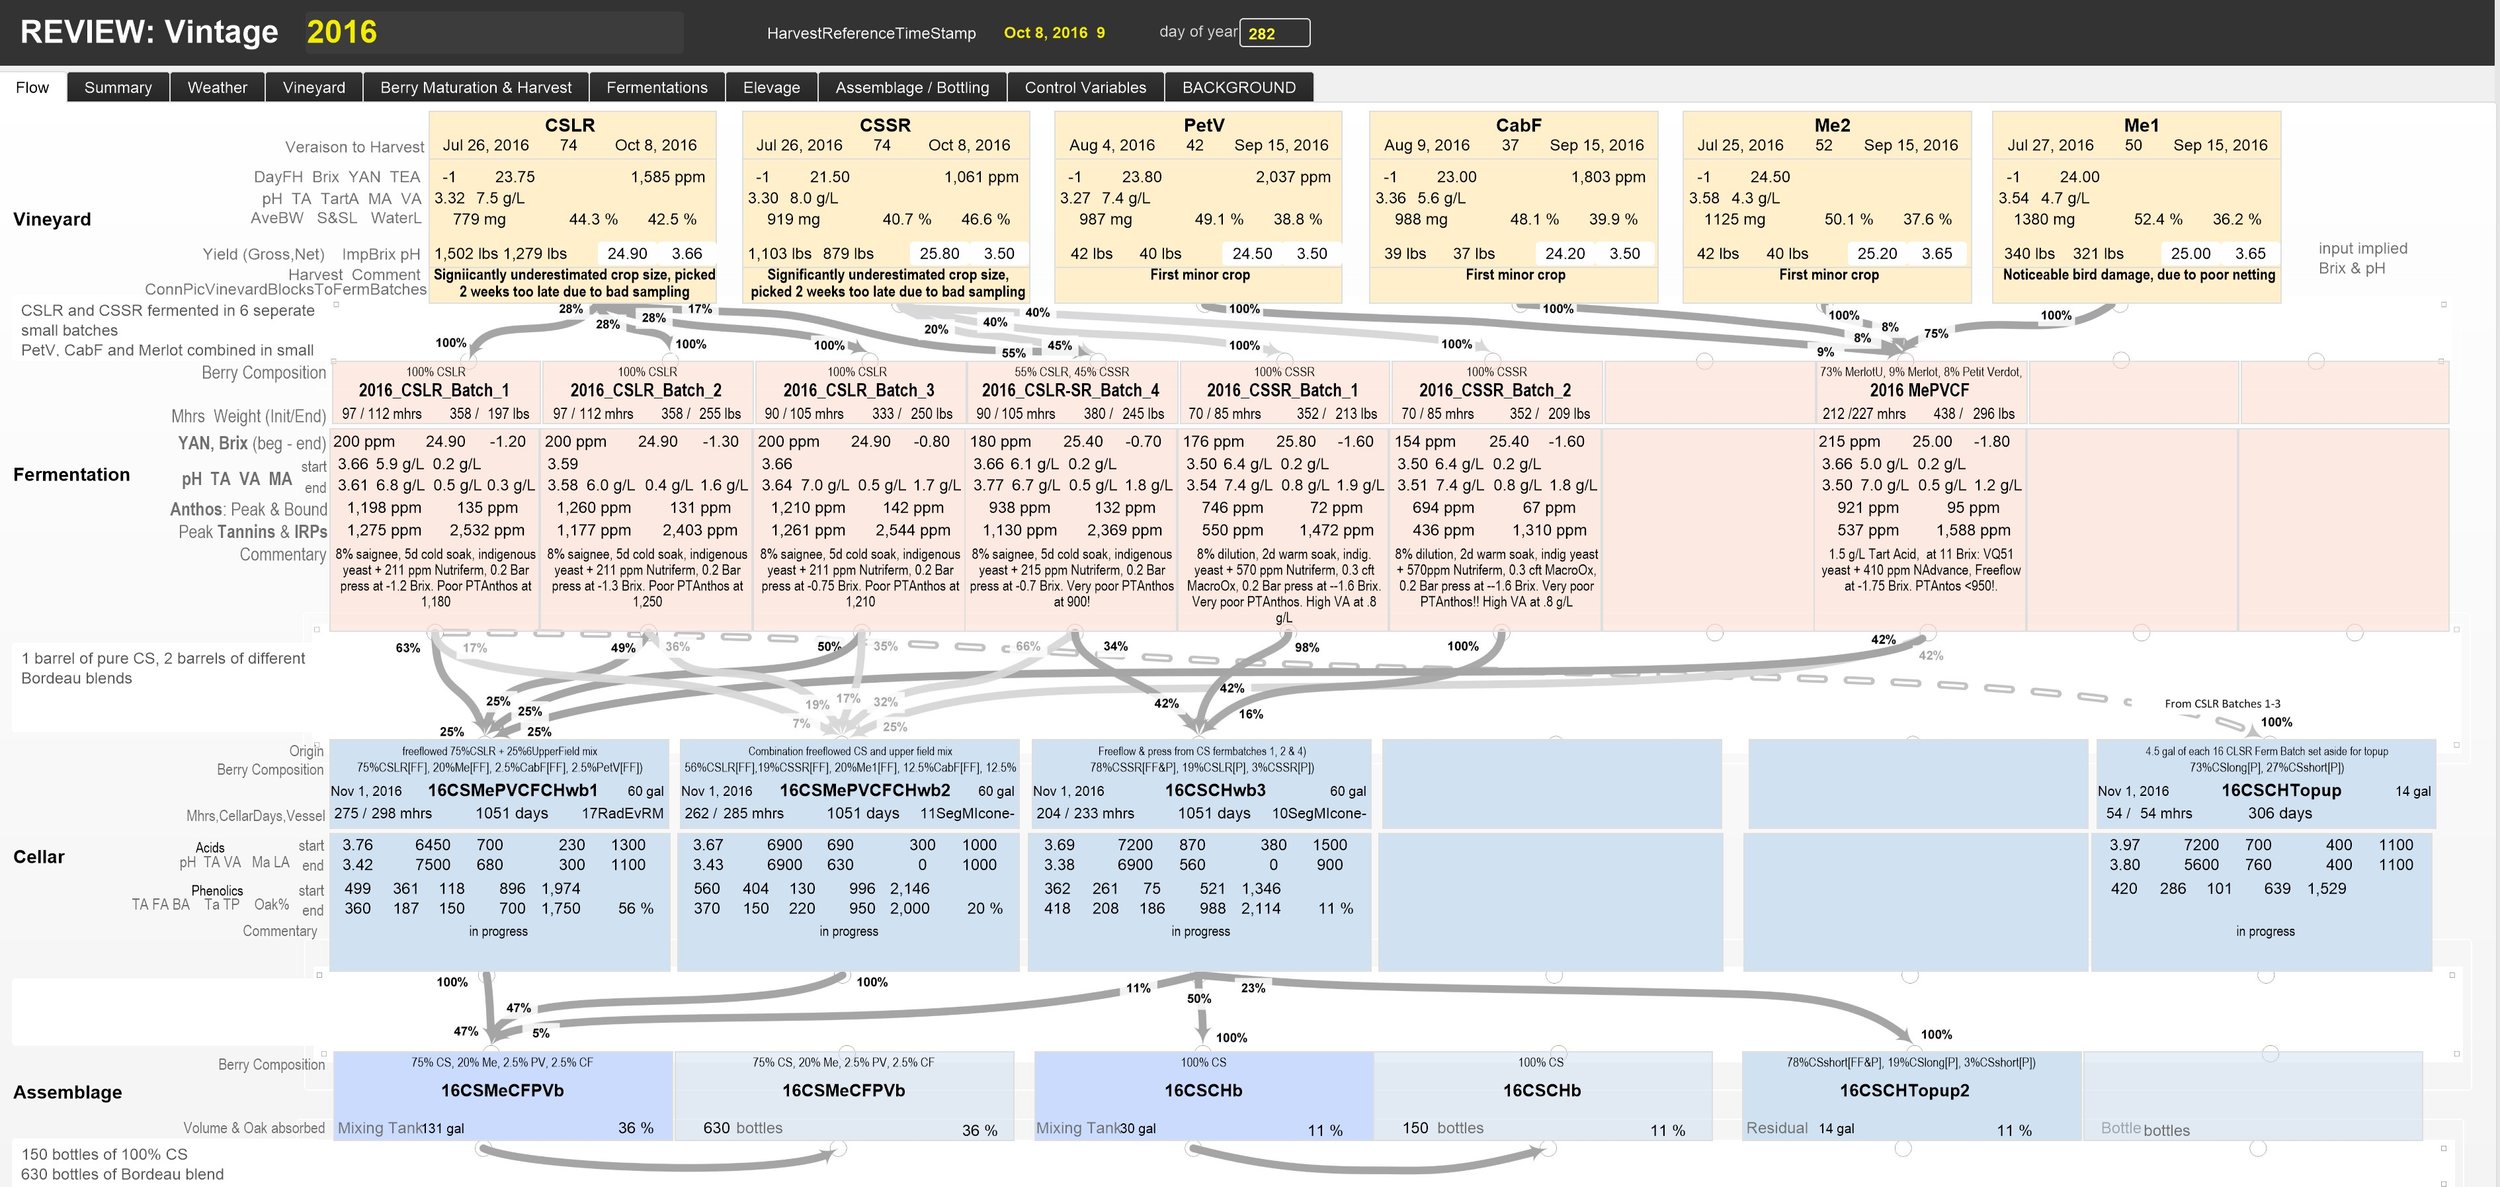

We include the 2016 vintage to illustrate the process differences from vintage to vintage. In 2016 we fermented the Cabernet Sauvignon in 6 small batches and the Petit Verdot, Cabernet Franc, and the two Merlot blocks in a single small mixed batch. We pressed the wine into 3 barrels and one vessel for topup wine.
In 2017 we fermented the Cabernet Sauvignon (CS) long-row block in four small fermentations (we abandoned the short-row block), we fermented the Petit Verdot (PV) and Cabernet Franc (CF) blocks together. We fermented the Merlot (Me1 & Me2) blocks separately. We then pressed the CS into one barrel, and we combined the PV-CF and the two Me fermentations into another barrel. The topup vessels are not shown
In 2018 we combined the two CS blocks in one large fermentation batch, we fermented the PV block on its own, and we combined the CF and Me blocks in two small fermentations. Then we pressed into three barrels and three topup vessels, one pure CS, the other two, different mixtures of CS, PV, CF, and Me.
In 2019, we again combined the two CS blocks in a single large fermentation batch, but we fermented the other four blocks separately. We then pressed the CS fermentation into two barrels, the Merlot fermentation combined with a bit of CS into a third barrel, and we PV and CF fermentation s into topup tanks.
In 2020 decided to create separate dedicated topup tanks, one for each barrel. So, we fermented the CS blocks together and pressed them into two barrels, and attached topup tanks. We fermented the PV and CF blocks together and the Me blocks separately, and then we combined all with the left-over CS into a mixed barrel and dedicated topup.tank
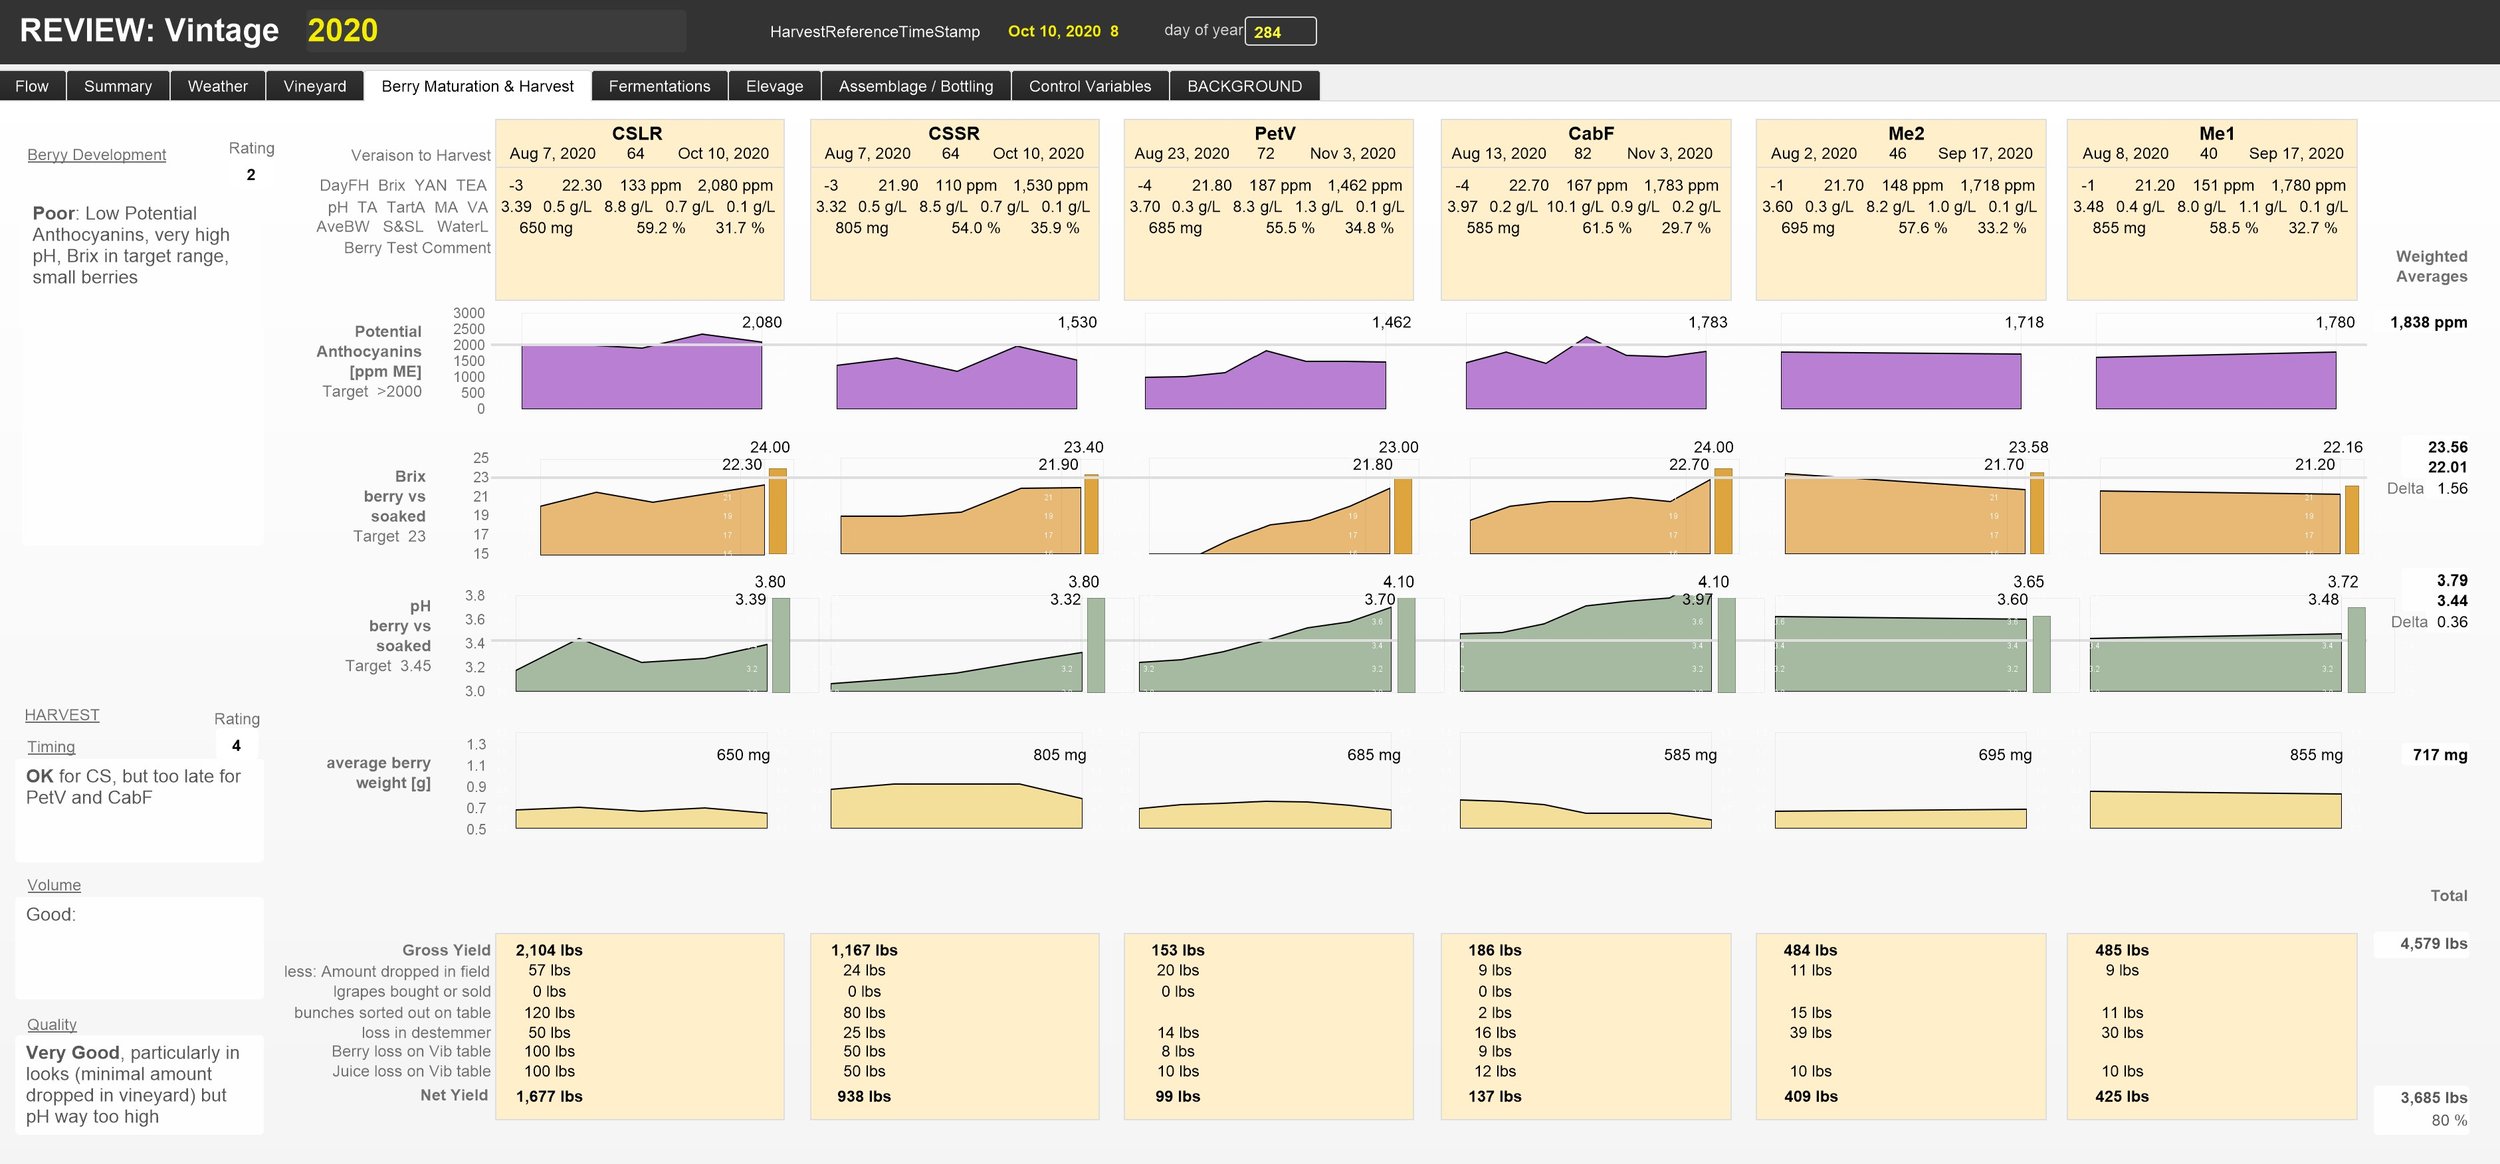
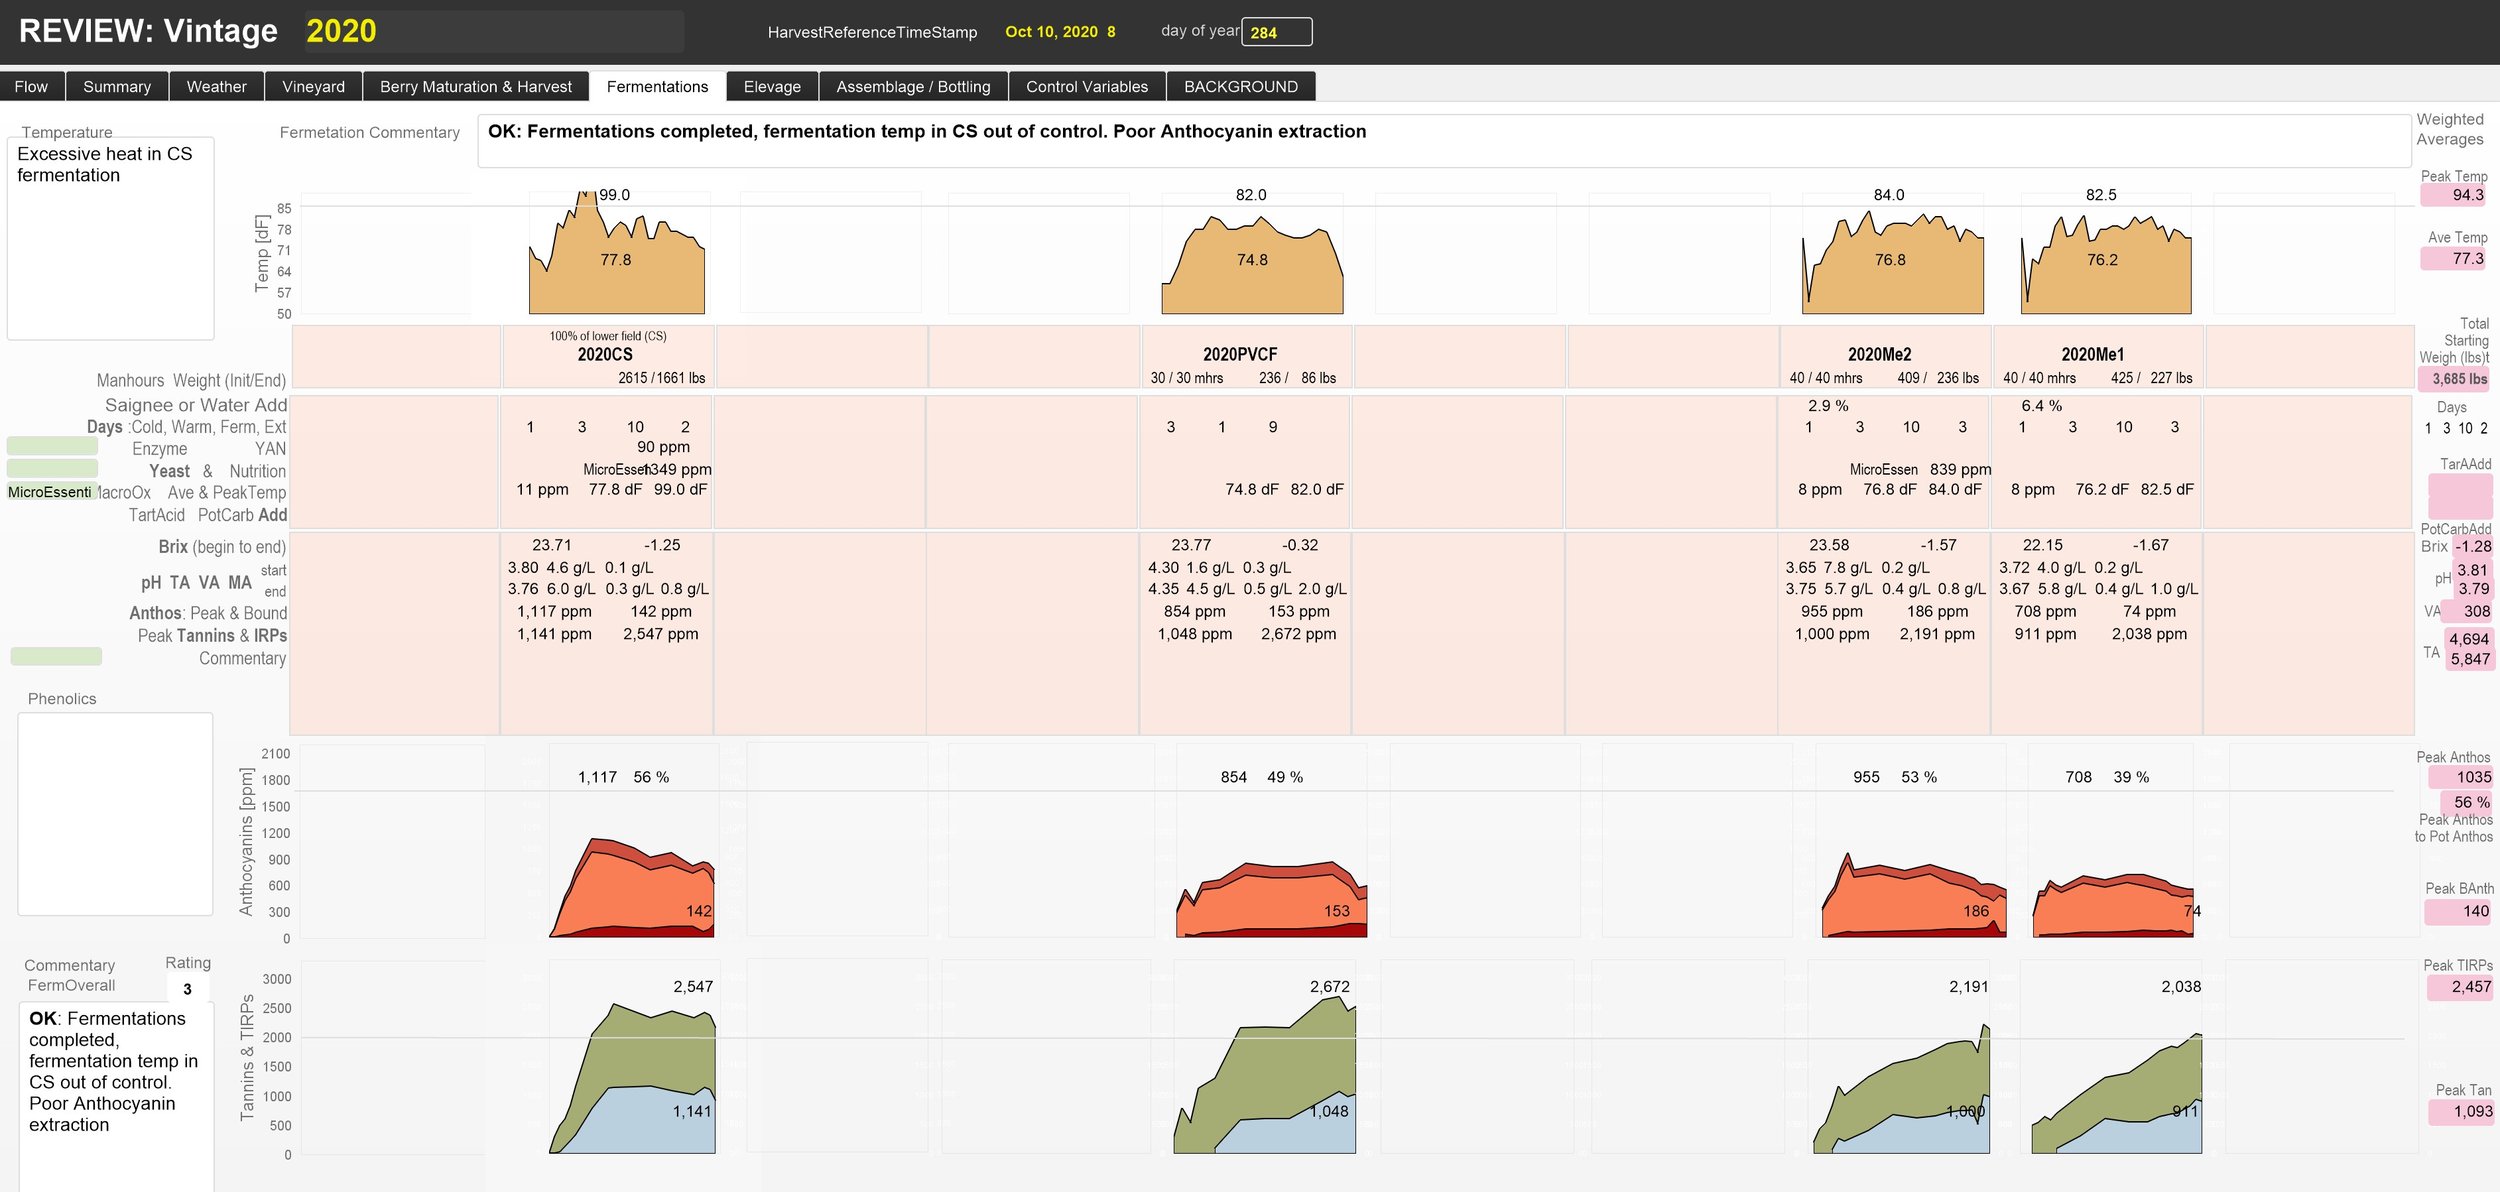
The next two screenshots are again from the “REVIEW: Vintage”-layout, but they show the Berry Maturation and the Fermentation tabs for more detail on the 2020 vintage
The Berry Maturation tab shows how the different vineyard blocks matured and how the Potential Anthocyanins, PH, Brix, and average berry weight developed during the last weeks of berry maturation – these measures defined the selection of the respective harvest dates
The Fermentation tab shows more details on each fermentation batch: the development of fermentation temperatures, and the extraction of Anthocyanins (bound and total) and other phenols (tannins and total)
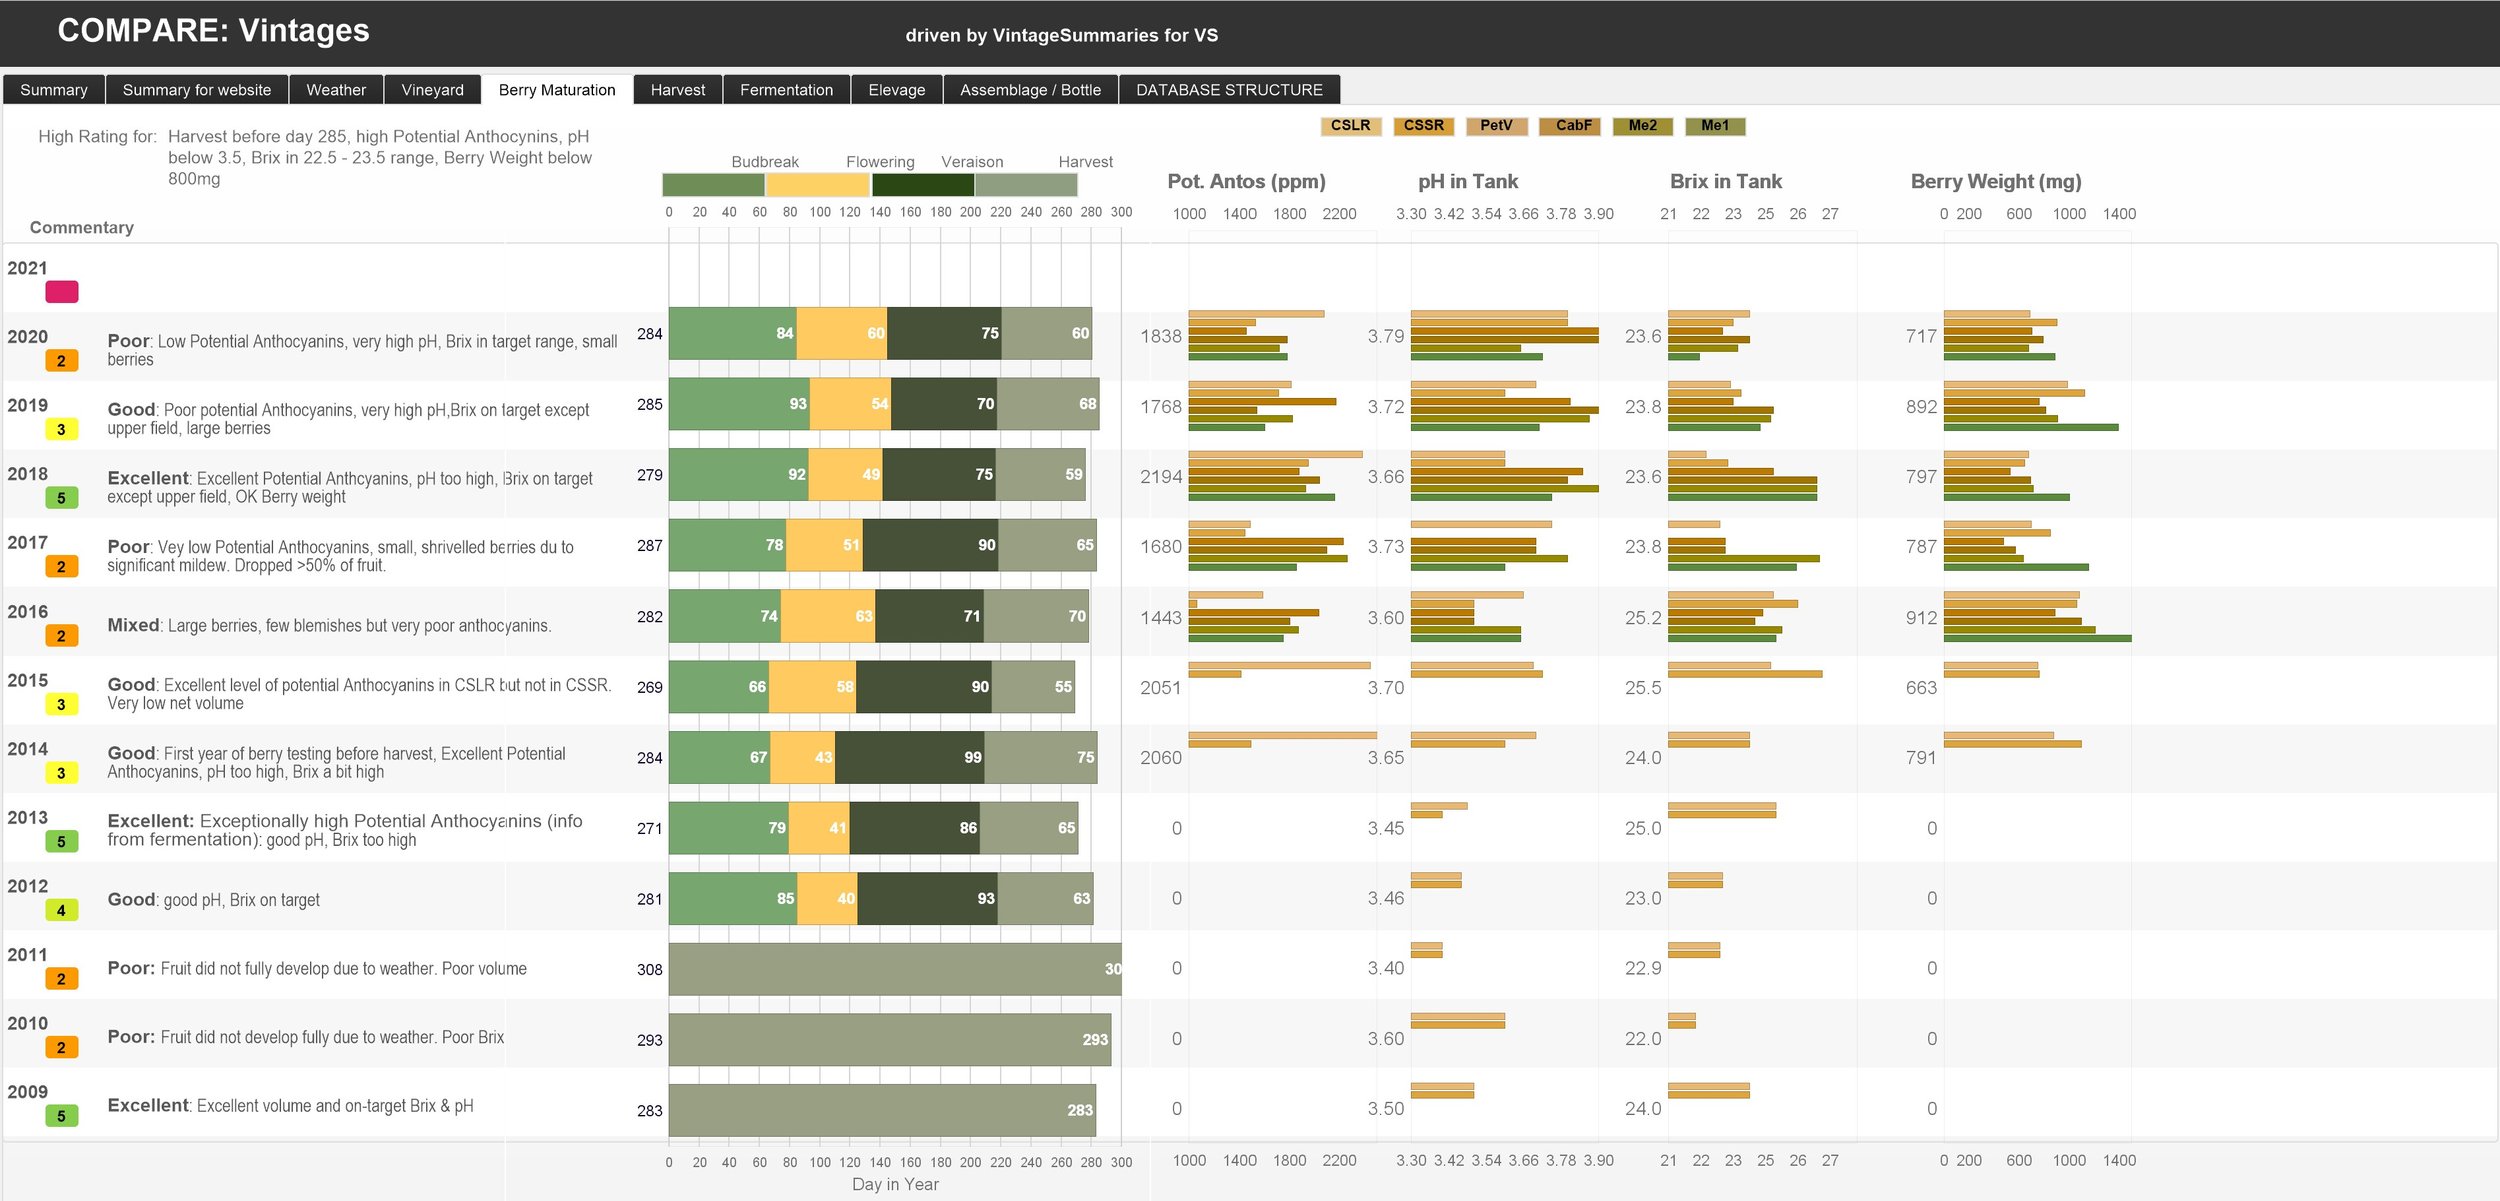
The final screenshots are from the “COMPARE Vintages”-layout and show average data for each vintage since 2009. The screenshots rate each vintage and provide a short commentary.
Berry Maturation: shows the timing of Budbreak, Flowering, Mid-Veraison, and Harvest in days of the year. And for each harvest block, it shows Potential Anthocyanins, pH, starting Brix, and Average Berry Weight. From this perspective, 2009, 2013, and 2018 were the best vintages
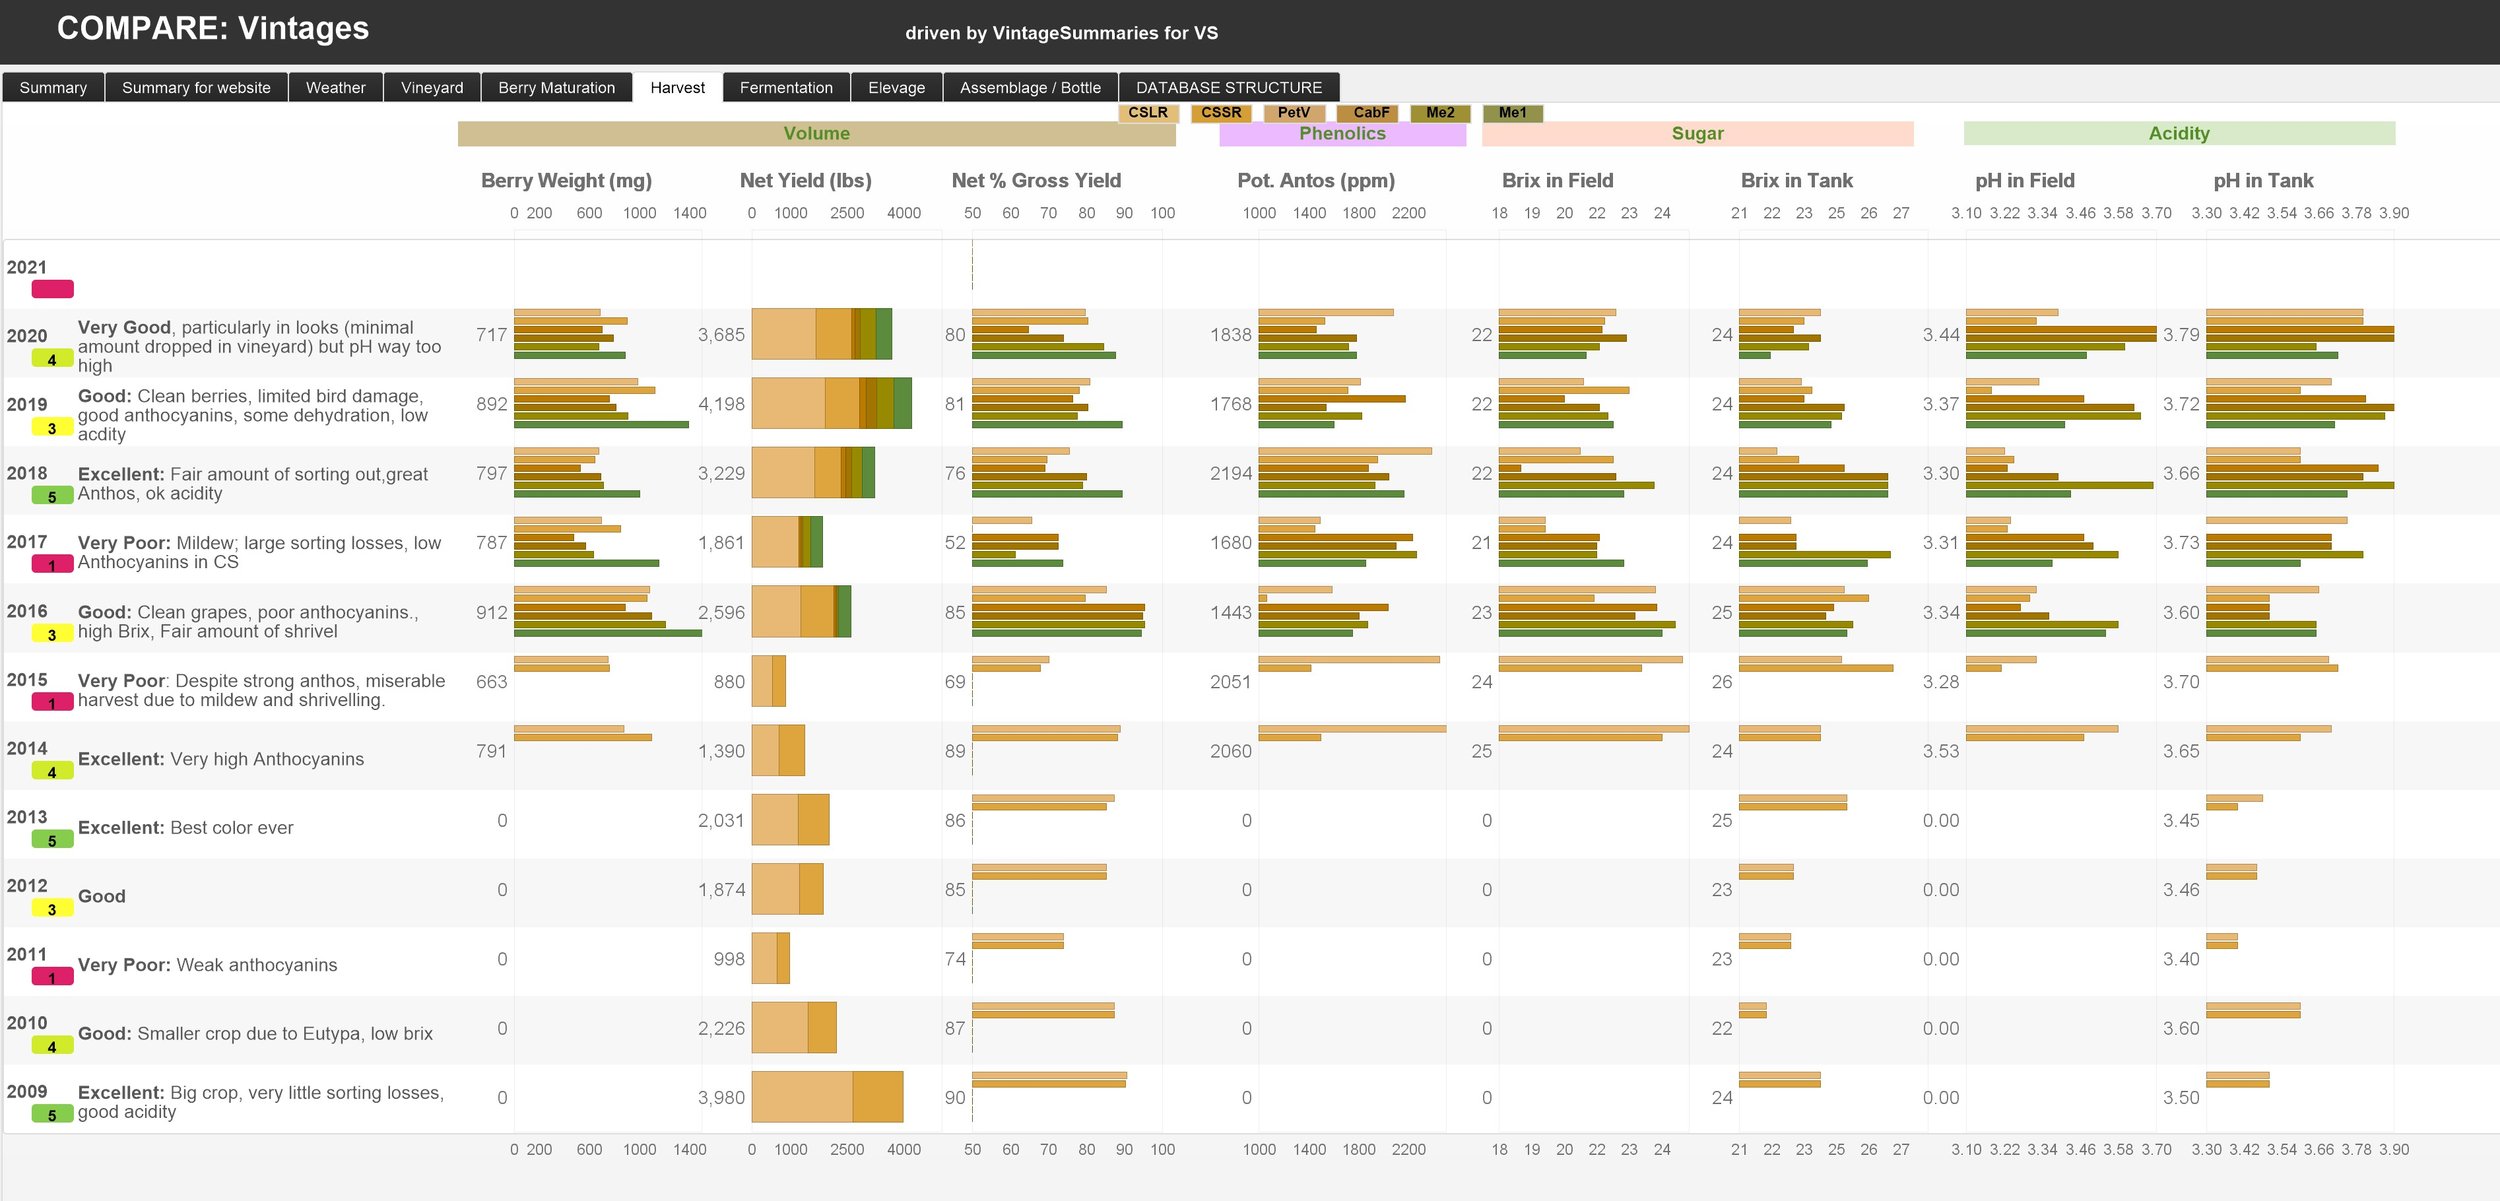
Harvest Volumes: shows for each block average Berry Weight, Net Yield (after sorting), Net Yield as % of Gross Yield (before sorting), Potential Anthocyanins, Brix (in the field and tank), and pH (in the field and tank). Note, we tend to underestimate the Brix in the field by 1-2 Brix and the pH in the field by around 0.3. Again, 2009, 2013, and 2018 ranked the best.
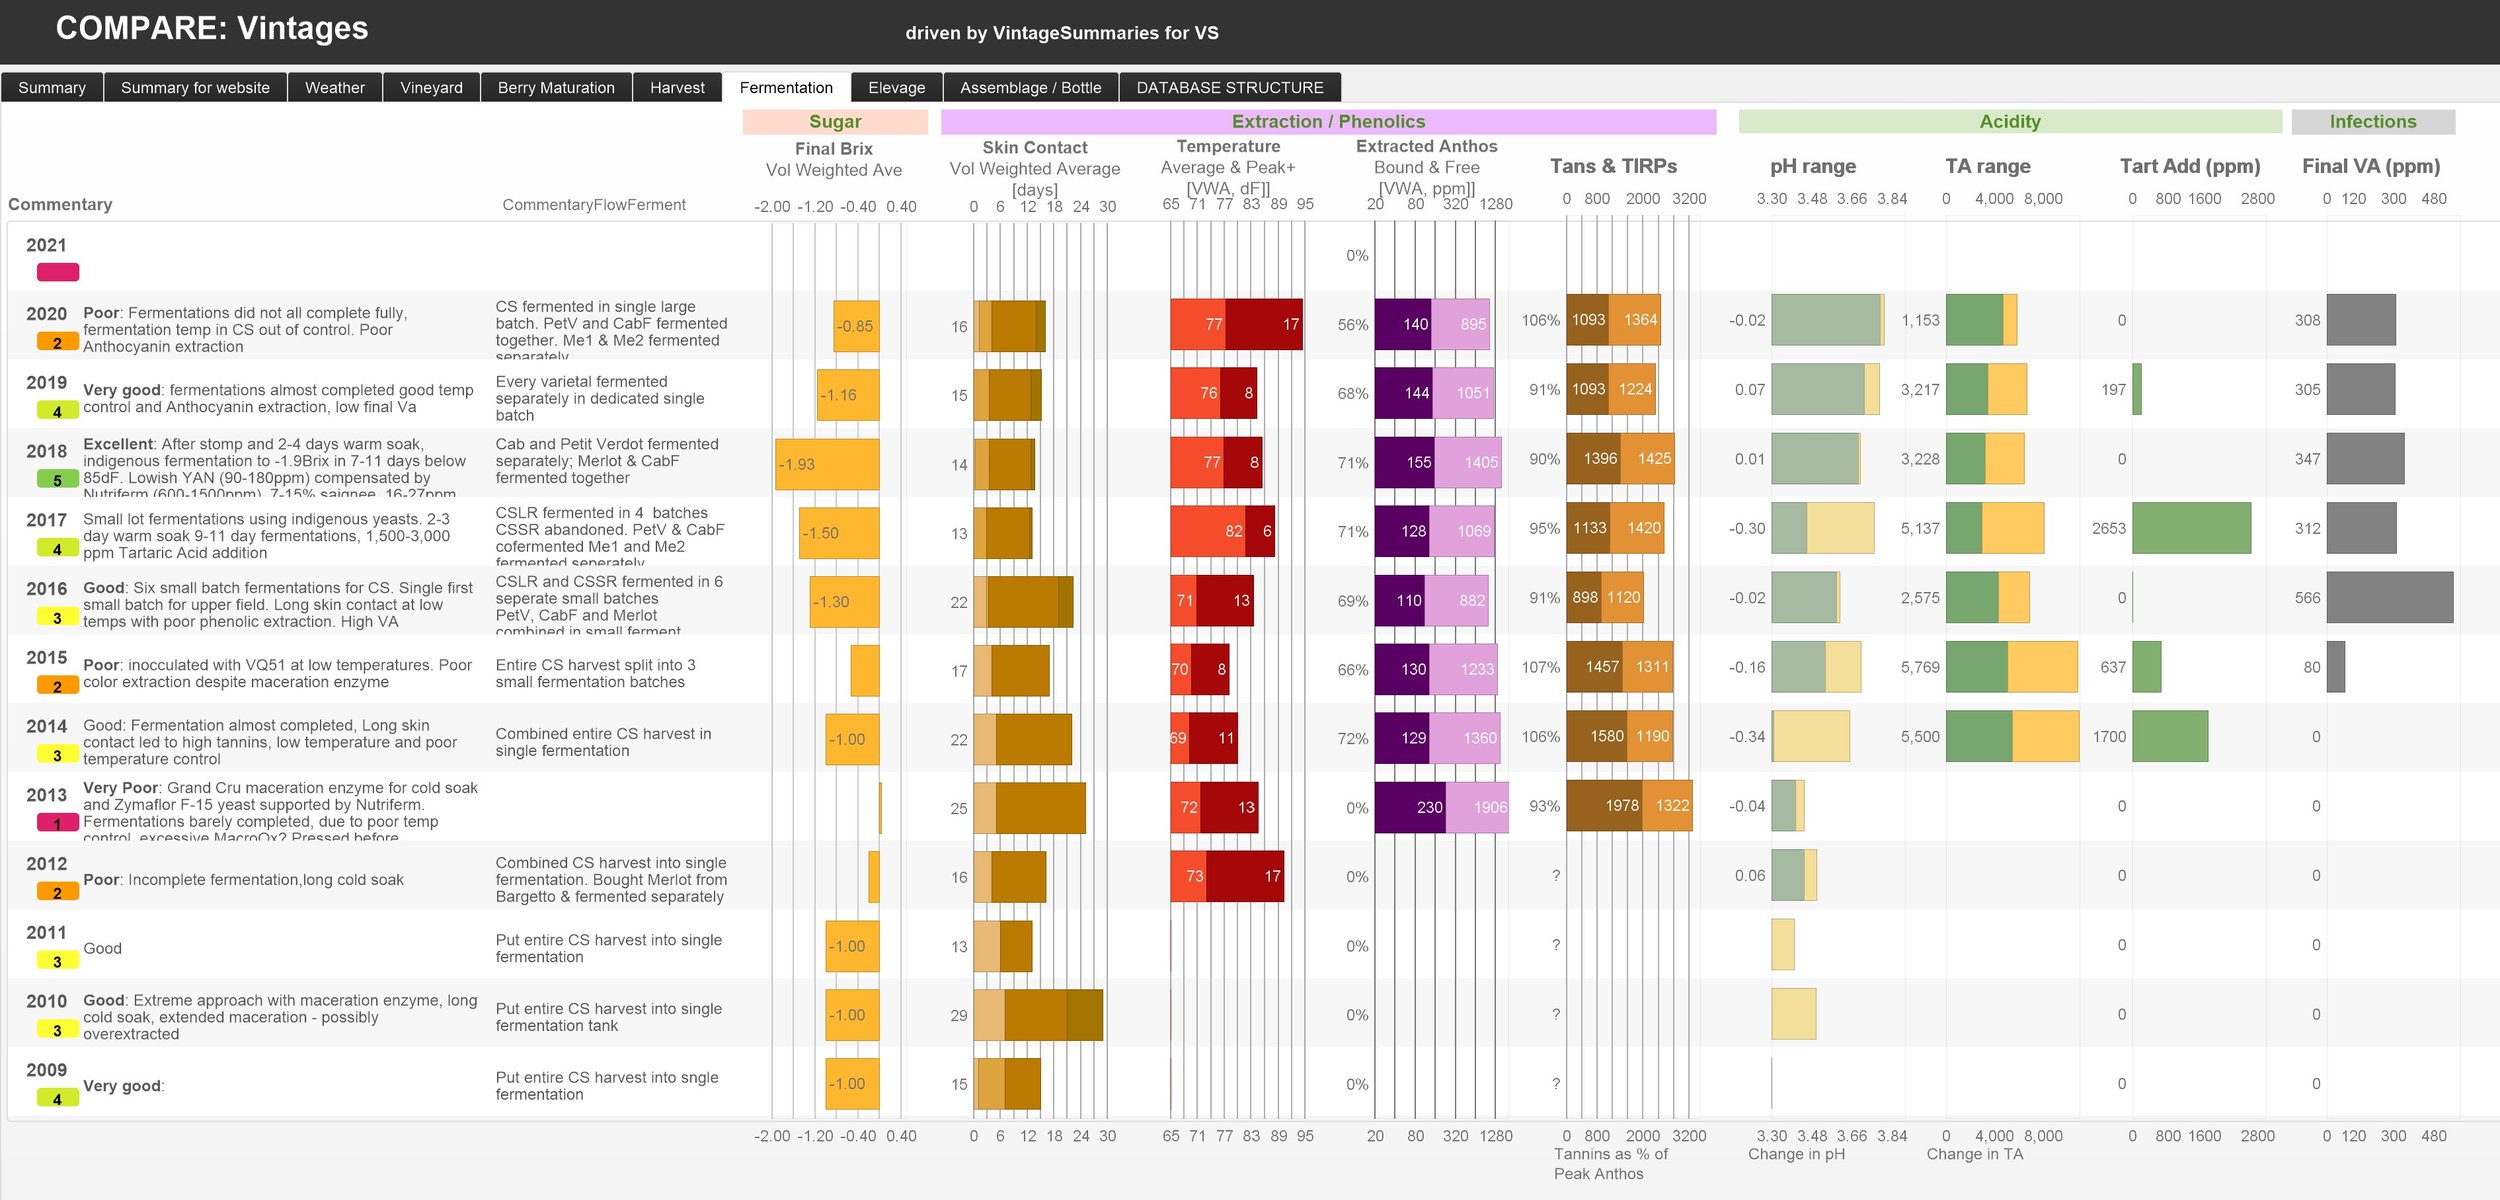
Fermentations: show weighted average numbers across all fermentations in a given vintage: final Brix (target is smaller than -1.25), days of skin contact, average and peak temperatures, extracted Anthocyanins, Tannins and TIRPs (Total Iron-Reactive Phenols), pH, Total Acidity and Tartaric Acid additions as well as final Volatile Acidity. From a fermentation perspective, 2018 ranked the best and 2013 the worst (we mishandled that fermentation)
A pdf file of the Winery Section as of December 4, 2021, is available here
Previous page: Home
Top of this page: Go
Next Page: Step#1 - Assessing Grape Maturity
Last updated: December 5 , 2021